Showing posts with label yarn craft. Show all posts

Monday, February 7, 2022

Weave a Chenille Stem Easter Basket

The finished yarn and chenille stem basket.

       Learn to make a very sophisticated Easter basket using textured and unusual yarns. This is a perfect Easter craft for using left over yarns that you may have tucked away in the drawer full of discards. I have so many supplies like this! I just hate to be wasteful and not use them somehow... The supplies you will need include: chenille stems (all white), yarn, cardboard, small nail and wire clippers. I made this basket for 2019, but I'm just now getting around to posting it here, sorry.
Selecting the yarn for this craft will greatly
determine how your finished piece looks!
Step-by-Step Instructions:
  1. Cut an oval from heavy cardboard for the bottom of your chenille stem basket.
  2. Use a nail to punch holes along the outer edges of the cardboard bottom.
  3. Bend the ends of each chenille stem around and up through the holes. The length of these fuzzy wires will predetermine the height of the sides of your basket.
  4. At this point you may wish to wire the bottom of your basket with an extra wire or chenille stem if you intend to display it on an Easter egg tree. To wire the bottom push a stem up through and back down into two holes strategically located in the bottom cardboard.
  5. Now continue to weave yarn in and out of every other chenille stem. The yarn you choose to use for this weave will greatly shape and affect the appearance of the basket; so choose carefully.
  6. Shape a wire oval the same size of the base to twist the tips of the chenille stems around at the top of your basket. 
  7. Weave additional yarn around the top edge to cover the top edge till smooth. 
  8. Wire loops at both ends of the basket using covered wires.
  9. Bend another wire for the handle and twist this through the wire loops at both ends to shape the basket handle. 
  10. Cover the basket handle with more yarn.
Left, Cut an oval from heavy cardboard for the bottom of your chenille stem basket.
Center, Use a nail to punch holes along the outer edges of the cardboard bottom.
Right, Bend the ends of each chenille stem around and up through the holes. The
length of these fuzzy wires will predetermine the height of the sides of your basket.

Left, The wires inserted into each nail hole. Right, see what the bottom looks like.

Left, I decided to glue a second layer of cardboard on the bottom of my basket to make it stronger.
Center, At this point you may wish to wire the bottom of your basket with an extra wire or chenille
stem if you intend to display it on an Easter egg tree. To wire the bottom push a stem up through
and back down into two holes strategically located in the bottom cardboard. Right, 
Now continue
 to weave yarn in and out of every other chenille stem. The yarn you choose to use for this
weave will greatly shape and affect the appearance of the basket; so choose carefully.

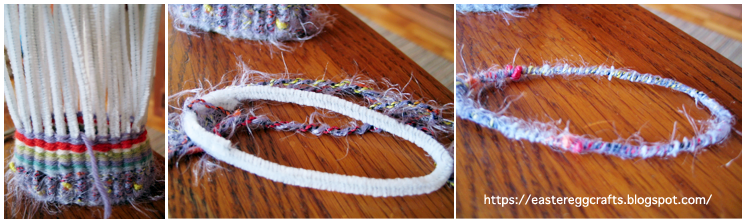
Left, I chose to switch out my yarn types to make a stripe. Center, the bent oval stem for the top
edge of my basket is the same size as the cardboard bottom, however, you could adjust this to be
larger or smaller to change the shape of your basket. Right, I covered this with yarn before and 
after attaching it.

Left, See the chenille stems wrapped around the wire edge. Right, see that I wrapped the edge of
the basket again with yarn to cover the exposed stems.

More Weaving Crafts:

Monday, February 12, 2018

Craft a Bird In a Nest Box

The Nesting Bird's Box by kathy grimm as seen from above.
       Although the assembly of this little box may be a bit challenging in at first, most of you will get the gist of it after a few seconds of trial and error. 
       Just imagine how different my box might look if I were to use paper or paint to decorate it? I loved the soft, tactile surface of this box. And the neutral brown shades gave it a bit of a modern twist in the finish, I think. It makes for an unusual Easter surprise!

Supply List:
  • small empty, clean carton with a screw top spout
  • paper or plastic bowl
  • cardstock or cardboard
  • masking tape
  • white school glue
  • plastic or styrofoam eggs
  • yarn for nest, eggs and bird
  • feathers
  • scissors
  • tissue paper 
  • Sculpey clay (just a small amount)
  • hot glue
Step-by-Step Directions:
  1. Clean with warm warm water and soap a screw top spouted cream carton. Then cut the top off including a generous piece of cardboard surrounding it. (see photo below)
  2. Cover the bowl's surface with masking tape on all sides.
  3. Take the paper or plastic bowl and turn it upside down on a piece of cardboard and draw around the edge to estimate the circumference of it's opening. Cut around this circle leaving about a half inch in excess from the drawn circle. 
  4. Remove the plastic lid from the carton piece and trace around it on top of the cardstock where ever you plan to have the box open. If your making a nest similar to mine, put it roughly in the middle.
  5. Punch a whole in the center of this smaller outline with the tip of your scissors and cut the small whole out. Make sure that the lid top fits neatly through the hole.
  6. Cover the top with masking tape. Cut out the hole shape if you cover this with the tape.
  7. Now push the lid opening and it's attached backing through one side of the container's lid. (see photograph below)
  8. Tape this secure and flip it over to screw on the plastic lid top.
  9. Notch around the half inch cut so that the edge may be turned under  or up slightly and then squeeze glue around this edge and nestle it on to the top of the bowl. Mask the top edge firmly to the bowl top. Let this form dry.
  10. Use glue and making tape to position and secure the plastic egg shells around the inside of the nest.
  11. Now unscrew the lid from the top of the box. Crush the tissue into the shape of a small baby bird and glue this to the lid's top. Be careful not to get tape, glue or paper on the inside of the lid so that it will continue to screw on and off of it's lip properly. 
  12. Mask this tiny bird with the tape.
  13. Sculpt a bit of clay into a open beak for the bird. Fit it onto the small bird's head to make sure that it looks the way you want before baking it into it's permanent shape.
  14. After baking this according to directions, let cool and then hot glue it to your baby bird.
  15. Now use the white school glue to cover your nest with yarns of your own choosing. This will need to be done in stages, the bottom first and so on...  Let the glued surfaces dry between stages over several days. (see detailed photos below)
  16. Include a secret letter and perhaps a bit of money inside your bird's nest box to give as a special gift for Easter or a child's birthday.
Left, "Clean with warm warm water and soap a screw top spouted cream carton. Then cut the top off including
 a generous piece of cardboard surrounding it." Right, you can see that I have cut a whole measuring the
 same size of the lid into the top of the cardboard "nest."
Left and Center, "Now push the lid opening and it's attached backing through one side of the container's lid.
Right, the opening of my Nest Box is neat, clean, and ready for decorating.
Left, "Now unscrew the lid from the top of the box. Crush the tissue into the shape of a small baby bird and glue
 this to the lid's top. Be careful not to get tape, glue or paper on the inside of the lid so that it will continue to screw
 on and off of it's lip properly." Right, "Use glue and making tape to position and secure the plastic egg shells around
the inside of the nest."


       Above is the top of the screw top lid covered with furry brown yarn, a Sculpey beak and real feathers, made to look like a baby bird. I went for a simpler look and opted to leave the beak unpainted this time. In the photographs below you can see the yarn covered box from different points of view as well as a close up shot of the box with the led unscrewed.


More Bird Crafts:

Tuesday, March 5, 2013

Weave a Miniature Yarn Easter Basket or Egg

      This miniature basket is woven using a braided rag rug method. To make a basket the size of the one pictured here you would need:
  • A braided length of yarn measuring approximately one yard; use three colors of any yarn or embroidery floss that you may have on hand.
  • You will also need thread and a needle. 
  • masking tape
  • You will also need some kind of a spool like form; I used a toothbrush container.

      Above is a pictured sequence for making the basket. If you click on the photo it will look larger in a new window. As you can see in the second frame, you will need to work the braid in a spiral pattern until it is roughly the size of a small coin. Whip stitch the shape as you go with the needle and thread. The color of your thread will be exposed so choose that shade wisely. I chose a shade of pale grey because I liked the way that it looked. Some of you, however, may choose to conceal your stitches by matching them to the yarn colors. 
      Loop the two ends of a piece of masking tape together and press it firmly to the end of your basket's temporary form and then mount the coin sized bottom of your miniature basket onto the the form. Now, as you spin and sew together the sides of the braided yarn to itself, the shape of the basket walls will begin to form. Soon, you will have a tiny basket fit for an egg. After you have crafted the basket to the size that you desire remove it from the temporary form. Add a handle by looping the remainder of the braided yarn from one side of the basket to the other, sewing these in place. You can always add more braid into the basket design with a threaded needle should the basket appear longer on one side. 
 
Far left, cut egg shapes from cardboard. Center, notch around it's edges. Right, weave yarn back and forth to make a design all your own.

        A simpler weaving exercise may be accomplished by younger students by weaving yarn around the perimeter of a cardboard egg. In this way teachers or parents can also involve children of multiple ages, both young and older, in participating in decorating an Easter egg tree or display.

Saturday, March 2, 2013

Eggs Decorated with Embroidery Floss

A basket of striped embroidery floss eggs displayed.  

 
        I used a very tacky white glue and embroidery floss to wrap these Styrofoam eggs for Easter. You can use as many colors as you like. I twisted a variegated, monochromatic colored floss on top of my Styrofoam eggs in order to get them to look like this.
      Above, as you can see, I've also glued onto this Styrofoam egg, pom-poms. Use the eraser end of a pencil to press a slight indention into the foam egg where you wish to position a pom-pom. Then fill this indention with white, tacky glue and firmly press the pom-pom into it. It will take approximately 24 hours for the pom-poms to dry onto the egg. After these have dried, twist embroidery floss around each pom-pom on the egg until it looks the way you like it.
Cardboard eggs made with ribbon.
       You may also have left over ribbons or yarn in your craft stash that could be used to decorate flat cardboard eggs like those shown on the left. 
       First, cut out the shape of an egg from a folded piece of paper to make an Easter egg with two identical sides. Then trace around that paper pattern on top of cardboard to make a durable template. 
       Reproduce multiple, flat cardboard egg shapes by tracing around the template on top of an old recycled box. Cut the eggs out and cover them with white typing paper and glue so that the ribbons you use will provide a sharp and colorful contrast against the decoupaged surfaces. Glue the ribbons on using the same white school glue. Let the ribbons dry completely before trimming them off around the cardboard egg shapes. You can make striped eggs or even plaid versions using all kinds of ribbon or yarn. Glue a ribbon at the top of each cardboard egg in order to hang these from an egg tree.

Friday, February 22, 2013

Create a Butterfly Yarn Picture

      Not only do yarn pictures have textures and colors that fascinate young and old students, these kinds of projects use up all the scraps of materials that you feel guilty about throwing away.  So why not put all of that stuff to a fun and creative use? 
      First you will need to give your students some newsprint so that they can practice cutting out butterflies. After they have made a stencil that they are happy with, have them trace it onto black paper or poster board with a white lead pencil. Every student will then need a bottle of white glue, scissors, and a pile of yarn plus odds and ends. I pasted chenille stems and pom-poms onto my butterfly yarn picture as well. Follow your butterfly outlines with a line of glue, pasting down the yarn in uniform lines a little at a time.
      Have fun experimenting. This project is best completed by students in 3rd grade and up. It can be done by younger ones but they may not have the patience to complete it. It takes quite a long time to finish a yarn picture so spread the activity out over several days. 
      If your students truely love the activity you may wish to give them sturdier wood boards to work on. Yarn paintings can become quite elaborate and decorative. There are several indigenous folk artist groups  that have mastered the art of yarn pictures. Exhibit a slide show of some of their work to inspire your students before starting the project. I will link to some of these folk artists below.

Left: My butterfly stencil, Right: I've traced around the butterfly stencil
 with a white lead pencil so that I can see my design on the dark
background paper.

My finished butterfly yarn picture has many textures and colors.
This project took me approximately three hours to complete.
The project measures 8 x 11 inches.

Examples of cardboard Easter eggs covered with yarn 
using the same methods at the yarn picture above. This 
is a thrifty way to use up your yarn art supplies!

Friday, February 15, 2013

Craft Spring Carrot Napkin Rings


       For this simple craft project you will need to gather a few supplies: one skein of yarn ( I selected a skein of darker, earthy colors), felt carrots (These vary from year to year depending on what is available in hobby stores), white tacky glue, a ruler, scissors, and clean paper toilet roles (three napkin rings may be cut from one standard sized toilet tissue role).


       Measure and cut each toilet paper role into to three equal parts, then glue yarn down slowly as you push it through the hole and over the top of the tube. Both the inside and outside of each tube should be covered with yarn as it is pictured in the photo above. This is a slow methodical process and your second, third and fourth napkin ring will improve as you become accustomed to the method. Make as many as you need. If you should give these as gifts, it is standard practice to include table decorations in sets of four, for four place settings you would include in a gift, four napkin rings, four fabric napkins and four place mats etc... For a wedding shower, it is considered appropriate to give two sets of any decorative tableware, in other words, eight. This is so that the couple may anticipate guests at a holiday celebration.


       After the paper rings have been wrapped with yarn, let these dry over night and then hot glue the felt carrot decorations to the top side of the napkin rings. Choose the side of your ring that has the most attractive color combinations to attach the carrot to. These table decorations are particularly versatile because they may be used any time during the spring or summer to decorate a place setting for a garden tea party, a barbecue and at a Easter dinner party.


Sunday, January 27, 2013

Eggs Decorated With Antique Lace and Faux Pearls

Natalie cradles the lovely goose egg that won a $100.
 dollar gift certificate from Hearthsong when she was
only four years old.

Cardboard, covered lace eggs.
      When my oldest girl was very young, I crafted this lace covered goose egg to submit to a local drawing at a Hearthsong toy shop in our neighborhood. The grand prize for entering the Easter egg competition was a $100.00 dollar gift certificate. Each entry had to be submitted with a decorated egg for the store's egg tree that was displayed in their front window. I won the grand prize and my little girl received the most wonderful toys for her Easter basket and Christmas stocking that following year.
      The egg was very easy to make. I simply glued some antique lace to a very large goose egg and then added a strand of faux pearls to the top so that the egg could be hung. In time the store returned my submission and our family has displayed the egg at Easter every year since then.
       Younger egg makers may like to try crafting cardboard versions of the same layering techniques. Cardboard is easier to work with and young people can come up with some stunning results just as long as they take care when using a glue gun. The sample lacy egg shown here on cardboard was first covered with jute twine and hot glue in a spiral design. Afterwards the lace ribbon and beaded clippings from a formal, recycled gown where glued in layers on top. The results as you can see were satisfactory.