Showing posts with label embroidery. Show all posts

Thursday, March 20, 2025

Collar Design in Bulgarian Embroidery

       I am furnishing you a pretty design today. the very name of which will call to your mind the peasantry of the Balkan Mountains who are noted for their remarkable skill in completing some of the handsomest embroidery of historical beauty. It is their aim and delight to use a great many colors, intermingling them in a manner so clever that one color blends like a shadow into its adjoining part.
      For this pattern I suggest for the center pieces, or floral motif, the different shades of blue, ranging it from pale blue to a china or phenol blue, or begin the wheel center with medium blue and graduate the tones to a navy blue. In the stem and leaf portions use dark leaf green in outline, then a lighter green for leaves, with a very pale tip-green. The butterfly can be worked in Delf blue with wing spots of blue, two colors, and a mere touch of green. Miniature triangles on collar border should be worked in green. Fill the notches in satin-stitch of dark green floss, and border with a scallop of dark blue. I have offered this color scheme because the colors, as a rule, wash well.
      All portions are in solid effect, with the exception of wheels, made with Battenberg stitches. The pattern can be developed in all white, but I feel sure you will like a color effect to create a decided novelty in your finished collar. Sincerely yours, Winifred Worth

Restored illustration of collar design.

Old-Fashioned Embroidery Designs for Plate Doilies

Satin, outline, eylet and button-hole stitches.
       These designs may be worked in either solid or eyelet. Detail drawings, show method of working.
      There are two ways to apply the designs to the material upon which you wish to work them.
      If your material is sheer--such as handkerchief linen, lawn, batiste, and the like--the simplest method is to lay the material over the design and with a well pointed pencil draw over each line.
      If your material is heavy secure a piece of transfer or impression paper. Lay it face down upon this, then draw over each line of the paper design with a hard pencil or the point of a steel knitting needle. Upon lifting the pattern and transfer paper you will find neat and accurate impression of the design upon your material. 
      There are two points to observe in this simple process if you would execute it satisfactorily. One is to see that your material is level--cut and folded by a thread--and that your design is placed upon it evenly at every point. 
      The second is, when placed accurately secure the design to the material with thumb tacks or pins, so it cannot slip during the operation.
      Do not rest your hand or fingers upon any part of the design while you are transferring.
 
Historic embroidery pattern depicting daisies.

Historic embroidery pattern depicting wheat stalks.

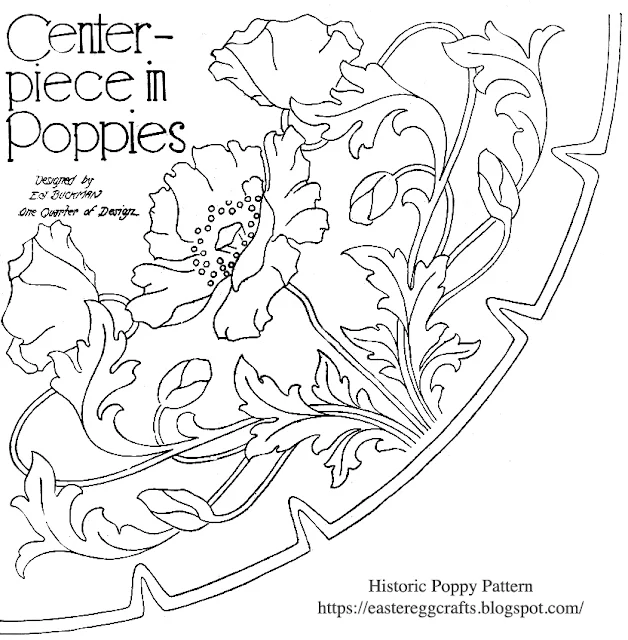
A Poppy Design for A Round Table

       The floral design pictured you can readily transfer to linen, leather or burlap by inserting a sheet of carbon, or tracing paper between the design and fabric, then going over all the lines of the design with a stylus or sharp pencil.
      You will then find the lines on the fabric distinct enough to follow in your embroidery. 
      This historic pattern has a lovely all-over design using poppies, their buds and leaves. Victorians loved to display a decorative vase with a bouquet, prominently in the center of a table covering like the one included here.
       Use brilliant reds, oranges and pinks to emphasize the design in your own version!

A draft of the historic poppy pattern.

Embroider Butterflies of Brilliant Hue

    Bright colored butterflies bring a feeling of joy and sunshine to one's work, and these dainty little creatures are charming in flower pieces or as separate motifs on table mats, curtains, dressing-table runners, and other household articles.
      Butterflies are so easy to work that no one need fear to attempt them, especially with the help afforded by the varied selection on the color samples shown below, and the chart, herewith, giving the direction for the stitches. These butterflies, also the dragonfly and bees, are originally from Weldon's Transfers (1900), you may reproduced tracings from the photo below in order to stitch butterflies similar to those embroidered at the turn of the last century.
      The wings are all worked on the same principle; the markings first in long and short stitch (or for the more definite spots and bands, in satin-stitch), and stem-stitch for veinings. All stitches should be directed towards the body. Between the markings the wings must be filled in with long and short stitch directed from their edge towards the body.
      For the body, long and short stitch can be worked lengthways, or rows of satin-stitch fitted one into the other, as shown on several of the specimens. The long and short stitch can be continued on the head, or this can be worked in satin-stitch. One or two little stitches of red or yellow, or some fairly bright color, are all that are required for the eyes.
      Stem-stitch or split-stitch gives a fine line for the antennae, which are tipped with one or two satin-stitches in the same direction as the stem or split-stitches. 
 
Color enhance reproduction of sample silk butterflies, bees and dragonfly by Weldon's Transfers, 1900.
This embroidery is done with fine silk threads.


Watch Malina embroider a silk butterfly using a satin stitch.