Showing posts with label egg craft. Show all posts

Thursday, April 4, 2013

Craft Giant Easter Egg Art!

      Below are student examples of three Giant Easter Egg pictures. Although each example is created with a distinct drawing or painting method, all of the pictures have the same theme. Sometimes crafts on the web are mislabeled under categories that use a method of working to describe the theme. It is the theme that is the subject of an art lesson and it is the method that is the verb describing an art project's process. When art educators are required to write lesson plans, they learn that the title of an art lesson includes the subject and that the description includes the process. 
      But on the web, teachers, crafters and companies selling their ideas and product will list the methods as the subject in order to drive traffic under different words and phrases to their web pages. This is why it is advantageous for teachers to search under both the method or the theme when surfing the web for any sort of craft/art idea.
crayon resist egg painting

      This giant Easter Egg was crafted using a popular wax resist method. Young students learn to color with firm pressure onto drawing paper before painting a watery solution of colored paint over the surface of their wax colors. The paint will then leave traces of painted paper where ever the crayons have not been applied. The use of this method is very popular in grade school because it shows students how they can use art materials and also develops their eye-hand coordination.

sponge painted egg

      This giant Easter Egg sponge painting requires young students to use unconventional tools in the act of painting. Sponges are easy for little hands to manipulate and these hold all kinds of sticky, messy paints made from inexpensive mixtures that kindergarten teachers can quickly shake together without investing large sums of cash in a art project. Small children do not generally produce art that will be kept forever by anyone other than their parents so, it is important to use materials that may be expendable but also fun to work with. The key to developing student performance in art is repetition and inexpensive materials ensure that the activity is repeated frequently.

watercolor painted egg

        This giant, bright colored Easter egg was painted with watercolor paints and a soft camel hair brush. First the student used a black marker to draw her whimsical butterfly, fish and flowers. Then she painted in her picture with bright, festive colors. I have discovered that very young students produce marvelous watercolor paintings but grow apprehensive about the resulting finished product as they age. This is because the younger an art student is, the less inhibited they are about "how" their artwork looks. Their inhibitions are the unfortunate result of growing old, I'm afraid.

More Helpful Links to Homemade Paint Mixtures:


This video, from Nuttin' but preschool, demonstrates an excellent step-by-step process for making homemade "tempera" paints. However, if you are an artist, you know that actual tempera paints used by professionals include an egg binder. So here is an old recipe for high school students.

Thursday, March 28, 2013

Craft An Empty Tomb Easter Egg

The finished empty tomb Easter egg, front and side.

    I crafted this empty tomb Easter egg with air dry clay, a half shaped, Styrofoam egg and paint.      The egg form also has a hollow interior and I will post a photo of what these look like just as soon as I can take a picture. 
      For those of you who may be a bit intimidated by shaping your own stones from clay, there are shallow molds for sale in craft and hobby shops for the very purpose of crafting stone walls. The results are so nice that the purchase of one of these is an excellent investment. 
      After pressing the air dry clay into a mold, (shown below) simply adhere the printed clay to the Styrofoam egg with tacky white glue. You will then need to continue working while your clay is still wet. Use a toothpick or a fork and work the clay surface a bit by pushing deeper crevices between the stones to create a more three-dimensional stone wall surface.      I let my stone tomb egg dry over night then I painted it's interior with black acrylic paint. Next, I painted the exterior stones with shades of grey and pale browns. Being satisfied with my final results, I then pasted a cross shaped sticker to the interior of the egg shaped tomb and gave my entire Easter egg a coat of acrylic varnish.

Monday, March 25, 2013

How To Decoupage a Picture On To An Easter Egg

Here is an obvious question. "How do you decoupage a picture or a scene onto an egg?" Obvious question, rarely answered. Above you see a sweet example of this from a manufacturer of Easter novelty.


Here is my version of the same process, only, I've used an elaborate patterned design.


This lovely pattern was taken from a fancy dinner napkin. You need to separate the layers.
 Only use the top one.


Measure the length of your egg and cut rectangular strip from the napkin or tissue paper to fit neatly around it. Now you will need to cut at regular intervals, slashes into your design. Notice how I do NOT cut all the way through the rectangle. I leave about an inch uncut. This uncut central part of the rectangle is the continuous, uninterrupted part of the design that wraps around the mid section of the egg. The larger your egg the wider this section will be. After cutting this napkin thus, apply Mod Podge to the surface of your egg and carefully paste down the napkin, starting first with the middle part of the design. The fringed parts of the napkin will overlap some but the design will be preserved for the most part.


After cutting and gluing this first piece of the napkin, I then cut out parts of the design that I thought the most attractive from left over napkins and pasted these on the top and bottom parts of my egg where the design did not cover. This is because I used very large eggs for this project and my napkins were quite small.


This is the wider, bottom half of my egg that needed additional
 decoupage to cover it completely.


In order for your eggs to look professional, you need to use very thin
tissues for this project. This insures that the design will appear uninterrupted
 and hand painted. Also, I was very particular about the colors of eggs that
I used for the design. Had I used dark blue or purple plastic eggs,
this design would not be as attractive. The napkin is very thin and the
colors will show through the glue and tissue, so be selective. This egg was
yellow. The one below was pink.


Decoupage Easter Eggs:

Free Vintage Patterns for Easter Eggs

Painting patterns from left to right in order: An Old-Fashioned Calico Egg,
A Design Taken From Bright Ribbons, Czechoslovakia flowers in bright colors,
A row of yellow ducks on a batik egg and flowers/bow-knots from an old silk.

      Above are very old illustrated patterns for painting eggs, below are vintage patterns for sewing eggs and carrots. The egg templates include five sizes. 
       Select the size you prefer and then make a cardboard template by tracing around the size selected. 
       Cut four copies from fabric to sew together for one egg. A 1/4 seam allowance is included with the template. 
       I suggest sewing the eggs by hand instead of on the machine because the seams are so very narrow.
       After leaving an opening of one and a half inch, turn the egg right sides out and stuff tightly. Close the opening with an invisible stitch and then apply trims and fancy embroidery.
5 egg sizes. See two sizes made up in bumble bee flannel fabric at colorthebible.blogspot.com.
 
       To make fabric carrots, select the size, cut it out and trace around for the cardboard template. Cut just one triangle from orange fabric. Fold in half, sew down the side and turn right side out. Stuff with cotton filling up to the top of the carrot. 
       Sew a straight stitch around the top opening to gather it shut. Then attach a green ruffled ribbon or ruffled felt around the top gathered edges to cover and mimic the greens on top. You could also attach green lace alternatively for a folksy looking carrot.
 
See my vintage veggies in red-orange velvet with tassel tops;
 these are made with the simple pattern below.


3 carrot sizes

Tuesday, March 19, 2013

Easter Eggs That Imitate Wedgwood Blue Earthenware

Typical wedgwood blue
plate with white decor
      I have always been in love with Wedgwood blue earthenware. It is very expensive, however, so it is not likely that I will ever acquire much of it. I did find some "Wedgewood" look-alikes  in a hobby shop many years ago and adhered these medallions to Styrofoam eggs. Then, I covered the back half of my eggs with blue paint, glitter and some vintage lace. I strung my blue, "Wedgwood"eggs on glass bead hangers. These eggs are my favorites and I hang them on one of my Easter egg trees every year.
      In 1765, Wedgwood created a new earthenware form which impressed the then British Queen consort Charlotte of Mecklenburg-Strelitz who gave permission to call it "Queen's Ware"; this new form sold extremely well across Europe. The following year Wedgwood bought Etruria, a large Staffordshire estate, as both home and factory site. Wedgwood developed a number of further industrial innovations for his company, notably a way of measuring kiln temperatures accurately and new ware types Black Basalt and Jasper Ware. Wedgwood's most famous ware is jasperware. It was created to look like ancient cameo glass. It was inspired by the Portland Vase, a Roman vessel which is now a museum piece.. (The first jasperware colour was Portland Blue, an innovation that required experiments with more than 3,000 samples). In recognition of the importance of his pyrometric beads (pyrometer), Josiah Wedgwood was elected a member of the Royal Society in 1783. Today, the Wedgwood Prestige collection sells replicas of some of the original designs as well as modern neo-classical style jasperware. Read more . . .

Easter eggs featuring Wedgewood look-alike medallions. Push the medallions gently into the foam egg before gluing these in place with a tacky white glue.


My family has visited here during the summer months.
This makes for a relaxed, family friendly trip.

Craft a Humpty-Dumpty Easter Egg


The Humpty egg from different view points.

    This Humpty-Dumpty Easter egg is much easier to make than he looks. I used a small face mold and a bit of Sculpey clay to make his face. Although, some of you who do not like to paint, could use a bit of flesh colored polymer clay instead. After un-molding the clay mask, I then pressed it onto a wooden egg with a generous amount of wood glue sandwiched between the clay and wooden surface. Then I baked the entire egg in an oven for only a few minutes at recommended temp. on the package. If I had to make the Humpty egg again, I would probably opt for air dry clay. 
      I then let the egg cool and glued on a simple white collar and a bow tie, after I painted the head in flesh colored paint and lower portion of the egg in blue to suggest his shirt.
      Humpty-Dumpty named after a famous nursery rhyme was actually a relatively popular character to craft during the mid to later half of the 20th century during Easter and also for nurseries. I've included more examples of this funny egg fellow below.

Above are examples of face molds from my vast collection.

Humpty Dumpty's Easter Surprise by Dick Clarke

Include Tiny Vignettes Inside Easter Eggs

Here are a few more examples of decorated, flocked Easter eggs. These have been decorated by
cutting out an oval portion of the egg and gluing a tiny vignette inside the egg. Many hobby stores
 sell tiny vignettes; these are not difficult to locate. I covered the inside of my eggs first with glue
 and transparent glitter. I also added a bit of Easter grass to cushion my Easter miniatures.

After decorating the egg on the inside, I glued rick-rack, laces and bows to the outer shell and edges
 to cover flaws and to add interest to the surfaces of my Easter eggs. I used hot glue for this particular project.

More Scenes Inside of Easter Eggs:

Thursday, March 14, 2013

Stuffing Easter Eggs


      I purchased these dessert shop Easter eggs shaped like ice cream cones, cupcakes and petit fours. I loved the unique shapes. However, as you can see, appearances are all that I paid for; I will need to stuff them a bit more than I thought.


      I also purchased a pack of Squinkies to stuff into the little people's Easter eggs, just for fun. Extra candy, a few toys, coins and printed scriptures will make up the contents of these eggs for my family's Easter egg hunt this year. Why not swipe of few of the Easter scriptures below and print them out for your little ones?


Thursday, March 7, 2013

A hatching chick picture

      Students will need crayons or magic markers to color their eggs and chick for this picture project. They will also need scissors, white school glue, a print of the Easter chick template below and one sheet of 8 1/2 x 11 inch construction paper for their background.
This project also calls for the use of brass, paper fasteners.
      Some students may insist upon the construction paper being green or light blue because their thinking in art is more concrete or literal than their peers. Or, it may be that all of your students will choose these two colors depending upon their perspective. Do not insist, however, that students use green for grass or blue for the sky, if they choose not to. Children differ greatly when it comes to the interpretation of "how" art should look. Some students are more abstract in their thinking than others and there is certainly nothing wrong with this.
      The idea of  "Easter grass" is also loosely interpreted by manufacturers of the product. All types of Easter grass, be it plastic or shredded paper, is sold in the market place, in every color imaginable and you may wish to supply this for added dimension in your picture; in the pictured example, mine  is drawn.
      Eggs are also painted with an endless variety of colors, designs, and pictures. Some of your public school children may even include religious imagery on their eggs.
      Do not dictate or prescribe their choices. Remember that freedom of speech is only limited for teachers in public schools because they are paid by so many people, from all walks of life, who have many different beliefs. These limitations attributed to teachers are not the same, however, for the children that they teach. Therefore, it is neurotic to overreact to a student's choices concerning how they desire to represent the Easter holidays. If some of your school children include religious imagery for this project, you needn't make such a fuss. They have a right to their cultural ethnicity, opinions and creative endeavors. If you expect differences, then you will not need to overreact to unusual choices. I have left the eggs blank so that the children constructing and coloring the project may choose to decorate their own eggs as they wish.
      The black dot on the template is where you will need to poke a hole and insert a brass, paper fastener. Make sure that, when your students are ready to paste their eggs to the background sheet of paper, they do not paste above the small black line noted on the template. The upper part of the egg needs to be left unpasted in order to accommodate for the spinning chick!
       Students will need to print the above template out, cut and transfer the design onto heavy cardboard. By these means, students will learn about the making of templates and how basic patterns are designed. Teachers may choose to group students at tables so that one set of templates may be made and shared between three or four students. I never hesitate to add this step into an art project because students learn so much information about "how" to process through the designing of things. However, I would eliminate the step altogether under some conditions.  

Easter hatching chic template.


Teacher's sample of the hatching chic Easter egg craft.

       In this teacher's sample I should note that the egg design on the right is original to it's former publication. Easter egg crafts from 100 years ago are far more elaborate graphically speaking than they appear today. This is the result, I believe, of artists immediate association/familiarity with Ukrainian immigrants at that time. Today, most folks immigrating from that area of the world to the United States are Muslim. Wouldn't it be interesting to do research on graphic history with your kids? Perhaps that should be my next big art history lesson?

Wednesday, March 6, 2013

The Easter Egg And The Easter Hare...

Bunnies should use caution when
prepping their eggs.
      The Easter egg and that ubiquitous little Easter hare that defies all the natural laws governing mammals are well known to childish fancy. What child has not discovered on Easter morning a whole basket of beautiful pasque eggs and just missed the sight of the little Easter hare that laid them? He is almost as familiar a household personage as Santa Claus. Long hours have the children watched in the woods for him, only to go home and find they have just missed his visit there, and there are those beautiful eggs he left behind, in pink, pale blue, yellow and all the colors of the rainbow, some of them parti-colored, some painted with roses and some tied with ribbons. Of late years this enterprising little animal has gone far as to leave china eggs filled with bonbons, and that he leaves them there is no more doubt than that Santa Claus comes down the chimney on Christmas Eve, and who is so disloyal as to doubt that?
      There are various ways of preparing Easter eggs that give so much delight to little ones. The most elaborately decorated eggs should be emptied and washed of their contents before they are prepared. This is the most economical as well as the most satisfactory way to do: Pierce a small hole through each end, blow out the contents, wash the shells and leave them for several days to dry. Some eggs shells may be gilded, some silvered and some painted in oils. Simple gifts such as are suitable at Easter time may be conceded under these eggs.
      Plain boiled eggs, such as are served on the Easter breakfast table, may be easily dyed with vegetable dyes, which can be procured at caterers or dealers in confectioner’s supplies. It is not in good taste to make these eggs eaten at the breakfast table especially elaborate. The elaborate eggs are those which are supposed to be found incidentally after breakfast, on Easter morning, and are for the amusement of small children. A dish of pale green, white and yellow eggs at one end of the table or robin’s egg blue and pale yellow and white at the other end gives the breakfast table a festive appearance. It is easy enough to prepare a few eggs in each of these colors to obtain this effect. It is a little difficult to get a good green in eggs. Owning to the quantity of lime in the shells all eggs do not take this natural green color as some others will, and it is better to color eggs a simply as possible than to use any powerful dyes when eating them later.
      It is possible to decorate more ornamental eggs of which the contents have been blown out. Eggs may be prepared weeks before Easter and may be hidden away until the eventful morning. These simple eggshells when decorated in natural colors using roses or forget-me-nots and each strung on a fancy ribbon will last a long time, if taken care of.
      The eggs of nearly all ordinary birds, from the gigantic ostrich, whose shell is firm enough to be set in silver, to the smallest bantam, where at one time represented in many shops at Easter time. These were decorated, to hold various kinds of candies or for ornamental purposes. You will net to be diligent to find decorative eggs like these in antique shops or vintage resale in time for Easter if you live in the United States, for it is nearly impossible to find these mouth-blown, decorated eggs for sale. When my children were young, there was a chocolate shop down the street that sold these but that was highly unusual.

How to blow out an egg from Modernmom

More Related Content:

Saturday, March 2, 2013

"The Fruit of The Spirit" Easter Egg


        In order to make this Easter egg, you will need to purchase a small bag of alphabet pasta. DaVinci brand makes an alphabet pasta that is ideal and when you have finished the Easter craft, you can save the left overs for homemade tomato soup!
       I first cover my large, plastic egg with white glue and newsprint and set it aside on wax paper to dry over night. Then I pasted the three dimensional, paper flowers by Martha Stewart onto my egg. After letting the paper flowers dry, I then glued the pasta to spell out the fruit of the Spirit, love, joy, peace, forbearance (patience), kindness, goodness, faithfulness (loyalty), gentleness and self control.
      After the glue used to paste the pasta on the egg dried, I dipped my finger into a little black, acrylic paint and dabbed the alphabet letters with a bit of color. This enhanced the lettering so that it could be seen better. After the paint dried I used Mod Podge to seal the surface of the egg completely.
 
"But the fruit of the Spirit is love, joy, peace, forbearance, kindness, goodness, faithfulness, gentleness and self-control. Against such things there is no law." Galatians 5:22-23 - New International Version (NIV)

Eggs Decorated with Embroidery Floss

A basket of striped embroidery floss eggs displayed.  

 
        I used a very tacky white glue and embroidery floss to wrap these Styrofoam eggs for Easter. You can use as many colors as you like. I twisted a variegated, monochromatic colored floss on top of my Styrofoam eggs in order to get them to look like this.
      Above, as you can see, I've also glued onto this Styrofoam egg, pom-poms. Use the eraser end of a pencil to press a slight indention into the foam egg where you wish to position a pom-pom. Then fill this indention with white, tacky glue and firmly press the pom-pom into it. It will take approximately 24 hours for the pom-poms to dry onto the egg. After these have dried, twist embroidery floss around each pom-pom on the egg until it looks the way you like it.
Cardboard eggs made with ribbon.
       You may also have left over ribbons or yarn in your craft stash that could be used to decorate flat cardboard eggs like those shown on the left. 
       First, cut out the shape of an egg from a folded piece of paper to make an Easter egg with two identical sides. Then trace around that paper pattern on top of cardboard to make a durable template. 
       Reproduce multiple, flat cardboard egg shapes by tracing around the template on top of an old recycled box. Cut the eggs out and cover them with white typing paper and glue so that the ribbons you use will provide a sharp and colorful contrast against the decoupaged surfaces. Glue the ribbons on using the same white school glue. Let the ribbons dry completely before trimming them off around the cardboard egg shapes. You can make striped eggs or even plaid versions using all kinds of ribbon or yarn. Glue a ribbon at the top of each cardboard egg in order to hang these from an egg tree.

Wednesday, February 27, 2013

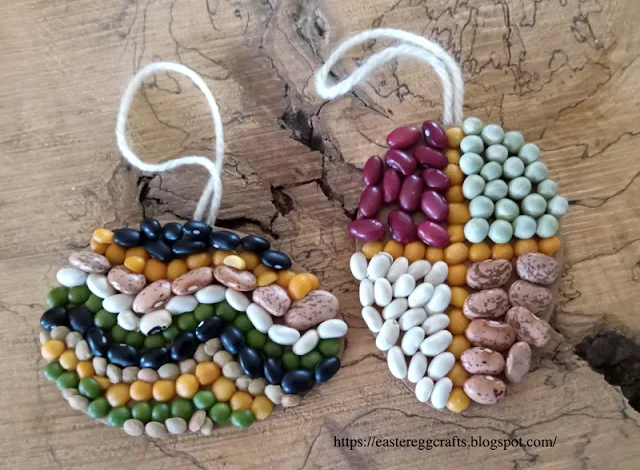
Cover Styrofoam Eggs and Cardboard Versions with Seeds and Beans

Pick up a mixed 15 bean soup bag at the grocery store and you needn't purchase so mush for 
variety in this craft...

      You can cover Styrofoam eggs with seeds and beans in an endless variety of patterns. The large Styrofoam egg pictured has a cross at one end and a yellow flower at it's other end. 
      It is important to use Styrofoam eggs for this craft so that you will be able to lightly press the seeds into the egg form as you glue these down.  This process will create a surface across the egg that is even and the seeds/beans will be firmly glued in place. Allow for a couple of days to complete your decorated egg. You will need to wait for sections of the egg to dry before completing others. Mod Podge the end product.
        If you would prefer to put bean eggs out after Easter for the birds, craft designs using a plastic eggs and use peanut butter for the glue instead. The birds will prefer you to decorate with seeds instead of the beans for sure!
 
The same egg decorating can be switched to cardboard shaped eggs for younger students.

Four Easter egg patterns in one!

Trim Flocked Easter Eggs with Rickrack

      These old-fashioned  flocked Easter eggs are covered with rickrack and bright, bold laces. Use tacky white glue to adhere the bits of lace and trim.

Related Content:

Jewel Encrusted Easter Eggs

Left, plastic gems used for this easy craft. Right the finished result in 3D.

      I encrusted these jeweled Easter eggs with plastic gems that I purchased from a hobby store. Before adhering the "gems" to the plastic eggs with a tacky white glue, I roughed up the egg's surfaces with sandpaper. It is important to remember to match the color of plastic egg with the same color as the plastic gem. This will make the final crafted egg look like it is professionally made.

Fake or faux gems in the center of each puffy cross sticker really dress up this Easter craft!

       To make the ''Sparkly Cross'' cardboard eggs above you will need to cut out several cardboard egg shaped pieces. Use white school glue to apply the glittery fabric on first, then adhere the cross stickers with a tacky craft glue. The stickers will not stay in place without extra adhesive otherwise. I found this particular set at a Dollar Store.

Monday, February 25, 2013

Easter Egg Coloring Pages: vintage eggs

I've drawn some vintage Easter eggs for little ones to color, enjoy.

Description of Coloring Page: coloring pages by Kathy Grimm, vintage decorated eggs, flowers, ribbons, stripes, Noah's arc, chick, patterns, crosses, stars, bees, butterflies, polka-dots

 
Don't forget to drag the png. or jpg into a Word Document and enlarge the image as much as possible before printing it folks. If you have a question about this Easter coloring page, just type into the comment box located directly below this post and I'll try to get back to you as soon as I can.

Wednesday, February 13, 2013

Decoupage Your Easter Eggs

      Decoupage (or découpage) is the art of decorating an object by gluing colored paper cutouts onto it in combination with special paint effects, gold leaf and so on. Commonly an object like a small box or an item of furniture is covered by cutouts from magazines or from purpose-manufactured papers. Each layer is sealed with varnishes (often multiple coats) until the "stuck on" appearance disappears and the result looks like painting or inlay work. The traditional technique used 30–40 layers of varnish which were then sanded to a polished finish. This was known in 18th century England as the art of Japanning after its presumed origins.

I decoupaged this hollow egg many years ago. I used a variety of papers both with both metallic and matte surfaces. The butterflies are made of Filmo clay. Read more about how to decoupage a larger picture from either a napkin or paper onto an egg's surface.


      The most likely origin of decoupage is thought to be East Siberian tomb art. Nomadic tribes would use cut out felts to decorate the tombs of their deceased. From Siberia, the practice came to China, and by the 12th century, cut out paper was being used to decorate lanterns, windows, boxes and other objects. In the 17th century, Italy, especially in Venice, was at the forefront of trade with the Far East and it is generally thought that it is through these trade links that the cut out paper decorations made their way into Europe. 
      Artisans in Florence, Italy have produced decorative objects using decoupage techniques since the 18th century. They combined decoupage with other decorative techniques already popular in Florence, such as gilt with gold leaf and carved wood designs. These older techniques were already used to produce articles such as furniture, frames for paintings, and even tooled leather book covers. Known as Florentine style crafts, these items are now highly collectible antiques. Decoupage was added to the Florentine artisans' methods by adding it to the space within a carved gilt frame, or by adding the decoupage to a wooden plaque. Artisans used pasted reproductions of famous artworks, nearly always religious depictions. Florentine triptychs using decoupage images of such Biblical scenes as the Crucifixion are a common motif. As society became more secular in the early 20th century, and non–Roman Catholic tourists began buying more crafts from Florentine artisans, decoupage images became less religious in orientation and more reflective of famous Italian artworks in general.
      Common household materials can be used to create effects. Here is a short list of supplies:
  • Something to decoupage onto. Examples include: furniture, photograph albums, plates, ceramics, shelving, frames, mirrors.
  • Pictures to decoupage with. These can come from myriad sources: newspapers, magazines, catalogs, books, printed clip art, wrapping paper, greeting cards, fabric, tissue paper, lace, paper napkins
  • Cutting utensil. Scissors, craft knife (X-Acto) or razor blades can be used.
  • Glue. Standard white glue works best if it is diluted with a little water. Specialty glues can be found in most crafting stores.
  • Smoother. Popsicle sticks work well. A brayer is a specialized tool like a miniature rolling pin designed to help remove wrinkles, remove excess glue and smooth pictures.
  • Glue spreader. Many things around the house can be use for this: cotton swabs, paint brushes, sponges.
  • Rags, sponges, tissue paper to help wipe up glue and other clean up.
  • Sealer. Glue or other decoupage medium can be used as a sealer. Alternatively, polyurethane, spray acrylic, epoxy resin or other lacquers are usually used.
      Mrs. Mary Delaney achieved unexpected fame at the age of 71 in the court of George III and Queen Charlotte of England thanks to the 18th century decoupage craze. Moving in the circle of Jonathan Swift and Sir Joseph Banks, and possibly taught art by William Hogarth, she was introduced to George III and Queen Charlotte by Margaret Bentinck, Duchess of Portland, and became a court favorite.
      In 1771, she began to create cut out paper artworks (decoupage) as was the fashion for ladies of the court. Her works were exceptionally detailed and botanically accurate depictions of plants. She used tissue paper and hand colouration to produce these pieces. She created 1,700 of these works, calling them her "Paper Mosaiks [sic]", from the age of 71 to 88 when her eyesight failed her. They can still be seen in the Enlightenment Gallery at the British Museum today.
      Notable modern day "Master Decoupeurs" include Durwin Rice, Violet Knoxville (Vanesa de la Puente) and Queen Margrethe of Denmark. Modern day decoupage has evolved over the years beyond the simpler style of gluing images to plates and vases. The use of high-tech printers, resins, and enamel sprays contribute to the "modern" decoupage method.

How Emilie Lefler decoupages her eggs.