Showing posts with label Decorative Eggs. Show all posts

Monday, March 17, 2025

Make an Easter Egg Pocket Pouch Craft

Easter Egg Nest, made from paper plate pocket.
       Young students can make these easy paper plate, egg pockets a day or even a week, if they are in Sunday school, ahead of time. Then teachers can fill them with a chocolate treat or two for the Easter egg hunt later. Once children have participated in egg hunts, Sunday breakfast and service etc... they may take the extra surprise home!
 
Supplies Needed:

  • two paper plates
  • one brass fasteners
  • colored markers or pencils
  • green construction paper or tissue paper
  • Easter grass
  • Easter eggs or chocolate candies
  • white school glue
  • scissors
  • white construction paper
More Paper Plate Crafts for Sunday School:
Left, see how the brass fastener is positioned. Right, see how the pocket looks when closed.
 
Step-by-Step Instructions:
  1. Cut a large egg shape from the white construction paper. This egg shape should be smaller than the diameter of the paper plates, but very large, leaving approximately one inch from each end of the paper plates showing.
  2. Draw repeating patterns across the egg shape. Then coloring the patterns in using either markers or colored pencils.
  3. Cut strips from the green tissue or construction paper. Using scissors cut ruffles or 'blades of grass' along one long length of the stripes. 
  4. Glue the paper grass behind and around the large patterned Easter egg. Let dry.
  5. Mount the egg and grass onto the center of one of the paper plates using school glue. The plate should be inverted, because you want it to form a hollow pocket when attached to the second plate.
  6. Use a green marker to color the background edge of this paper plate if you wish.
  7. Now turn the paper plate over and use a pencil to draw a 'cracked' jagged edge down the center of the egg and plate lengthwise. This will be the opening of the egg to find treasures stored inside of the Easter egg pocket.
  8. Attach only one side of the egg decorated plate half to the edge of the back paper plate half. Use glue squeezed along the rim to do this. let it dry completely before proceeding to the next step.
  9. Poke a small hole using the tip of your scissors or a hole punch, right at the edge of the back paper plate where you want the upper part of the egg pocket to attach and move open and shut to reveal the contents of the pocket.
  10. Insert the brass fastener.
  11. Now fill the paper plate pocket with Easter grass and treats for each student when they come back to class to show off their crafts to parents, brothers and sisters. This is the teacher's surprise for a party...

Monday, February 25, 2013

Easter Egg Coloring Pages: vintage eggs

I've drawn some vintage Easter eggs for little ones to color, enjoy.

Description of Coloring Page: coloring pages by Kathy Grimm, vintage decorated eggs, flowers, ribbons, stripes, Noah's arc, chick, patterns, crosses, stars, bees, butterflies, polka-dots

 
Don't forget to drag the png. or jpg into a Word Document and enlarge the image as much as possible before printing it folks. If you have a question about this Easter coloring page, just type into the comment box located directly below this post and I'll try to get back to you as soon as I can.

Wednesday, February 13, 2013

Decoupage Your Easter Eggs

      Decoupage (or découpage) is the art of decorating an object by gluing colored paper cutouts onto it in combination with special paint effects, gold leaf and so on. Commonly an object like a small box or an item of furniture is covered by cutouts from magazines or from purpose-manufactured papers. Each layer is sealed with varnishes (often multiple coats) until the "stuck on" appearance disappears and the result looks like painting or inlay work. The traditional technique used 30–40 layers of varnish which were then sanded to a polished finish. This was known in 18th century England as the art of Japanning after its presumed origins.

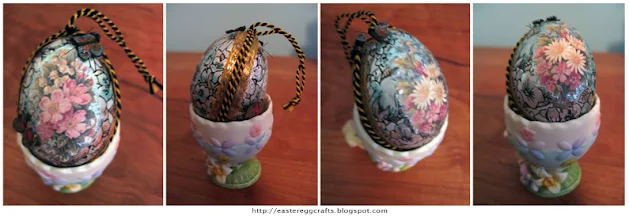
I decoupaged this hollow egg many years ago. I used a variety of papers both with both metallic and matte surfaces. The butterflies are made of Filmo clay. Read more about how to decoupage a larger picture from either a napkin or paper onto an egg's surface.


      The most likely origin of decoupage is thought to be East Siberian tomb art. Nomadic tribes would use cut out felts to decorate the tombs of their deceased. From Siberia, the practice came to China, and by the 12th century, cut out paper was being used to decorate lanterns, windows, boxes and other objects. In the 17th century, Italy, especially in Venice, was at the forefront of trade with the Far East and it is generally thought that it is through these trade links that the cut out paper decorations made their way into Europe. 
      Artisans in Florence, Italy have produced decorative objects using decoupage techniques since the 18th century. They combined decoupage with other decorative techniques already popular in Florence, such as gilt with gold leaf and carved wood designs. These older techniques were already used to produce articles such as furniture, frames for paintings, and even tooled leather book covers. Known as Florentine style crafts, these items are now highly collectible antiques. Decoupage was added to the Florentine artisans' methods by adding it to the space within a carved gilt frame, or by adding the decoupage to a wooden plaque. Artisans used pasted reproductions of famous artworks, nearly always religious depictions. Florentine triptychs using decoupage images of such Biblical scenes as the Crucifixion are a common motif. As society became more secular in the early 20th century, and non–Roman Catholic tourists began buying more crafts from Florentine artisans, decoupage images became less religious in orientation and more reflective of famous Italian artworks in general.
      Common household materials can be used to create effects. Here is a short list of supplies:
  • Something to decoupage onto. Examples include: furniture, photograph albums, plates, ceramics, shelving, frames, mirrors.
  • Pictures to decoupage with. These can come from myriad sources: newspapers, magazines, catalogs, books, printed clip art, wrapping paper, greeting cards, fabric, tissue paper, lace, paper napkins
  • Cutting utensil. Scissors, craft knife (X-Acto) or razor blades can be used.
  • Glue. Standard white glue works best if it is diluted with a little water. Specialty glues can be found in most crafting stores.
  • Smoother. Popsicle sticks work well. A brayer is a specialized tool like a miniature rolling pin designed to help remove wrinkles, remove excess glue and smooth pictures.
  • Glue spreader. Many things around the house can be use for this: cotton swabs, paint brushes, sponges.
  • Rags, sponges, tissue paper to help wipe up glue and other clean up.
  • Sealer. Glue or other decoupage medium can be used as a sealer. Alternatively, polyurethane, spray acrylic, epoxy resin or other lacquers are usually used.
      Mrs. Mary Delaney achieved unexpected fame at the age of 71 in the court of George III and Queen Charlotte of England thanks to the 18th century decoupage craze. Moving in the circle of Jonathan Swift and Sir Joseph Banks, and possibly taught art by William Hogarth, she was introduced to George III and Queen Charlotte by Margaret Bentinck, Duchess of Portland, and became a court favorite.
      In 1771, she began to create cut out paper artworks (decoupage) as was the fashion for ladies of the court. Her works were exceptionally detailed and botanically accurate depictions of plants. She used tissue paper and hand colouration to produce these pieces. She created 1,700 of these works, calling them her "Paper Mosaiks [sic]", from the age of 71 to 88 when her eyesight failed her. They can still be seen in the Enlightenment Gallery at the British Museum today.
      Notable modern day "Master Decoupeurs" include Durwin Rice, Violet Knoxville (Vanesa de la Puente) and Queen Margrethe of Denmark. Modern day decoupage has evolved over the years beyond the simpler style of gluing images to plates and vases. The use of high-tech printers, resins, and enamel sprays contribute to the "modern" decoupage method.

How Emilie Lefler decoupages her eggs.

Sunday, January 27, 2013

Add A Few Porcelain Geese to Your Easter Eggs!

China geese laying enormous eggs!

Crazy quilt Easter eggs.
      I made these eggs many years ago when my girls were quite small. It seems as though I frequently have too many "knick-knacks" cluttering up my drawers and toy boxes! Consequently, I am always looking for a way to recycle this stuff. These little china geese dressed in their Easter splendor seemed an obvious choice for decorating eggs. On many occasions I have hollowed out the eggs to create small vignettes with similar china pieces. However, this time I thought they would look endearing as new parents. Their eggs most have been switched out by some deviant hen because these eggs are far too much for the geese to keep warm! 
      You will need too hollow out two ordinary chicken eggs for this Easter egg craft and also purchase a couple of tiny nests to hot glue to the bottom of each egg. I added a little dry moss beneath the rumps of the geese  and also between the nests and the smooth surface of the eggs in order for the hot glue to adhere to both surfaces firmly.
      This type of egg craft could be treated quite playfully depending upon the characters you happen to have on hand. 
       If you are a former quilter like me, you may also have too many scraps of lace, ribbon and embroidery floss tossed inside of an old drawer or in a basket full of all kinds of trim. These crazy quilt versions of eggs were cut from an old quilt no longer in use and stuffed with batting until they resembled Easter eggs. Additional lace and ribbon was then sewn onto the rough seams and a embroidery blanket stitch sewn around the new outside seams to decorate the quilted eggs even more. Well, they don't call crazy quilts crazy for no reason! Add a ribbon for hanging and you've found a new reason to recycle more sewing clutter!