Friday, April 5, 2013

Craft Your Own Jingle Stick

      Jingle sticks can be made at home easily with very limited equipment. You will need a hammer, two sizes of long nails, bottle caps and some scrap wood. I used a long piece of cedar because it was what I had on hand. One of the nails you will need to use to make the holes in your bottle caps with. This nail should have a slightly larger dimension than those long nails you will use to permanently attach holding the bottle caps. 
      Hammer the holes with the larger nail into the metal caps and place a wooden scrape underneath the cap to give it support. Then you can through away this scrap wood and nail after you've completed the step. 
      Then you will need to rub down your stick with sandpaper and seal it with acrylic varnish. This procedure will insure that little ones will not get splinters from the instrument. After the varnish has dried overnight, hammer the long thinner nails through the holes in the bottle caps and into the wooden stick firmly. 
      Look closely at the picture above; note that the longer finish nails have wide heads. These prevent the caps from falling off the stick while it is shaken.

The Choir performing Ndyahimbisa mukama during the 20th Anniversary of the Choir in Vancouver in 2004 on stage in front of 2200 people.

Want to know more about the Choir and Music for Life? Go to http://africanchildrenschoir.com


Help Jesus Help 12 Million Orphans!!

Craft Your Own Sandblock Instruments

The finished sandblocks are ready for music class.

      Children and or teachers can craft sandblock instruments for their music class, a performance or just for fun. All you will need are blocks of wood, felt and a medium weight sand paper. I used a wood glue to adhere my sandpaper to one side of my wooden tablets after I cut and glued a layer of felt to the wooden blocks. The felt acts as pad to extent the wear of the sandpaper over time. Eventually, you will need to adhere more sandpaper to your instruments as the gritty surface wears down to the felt layer.

The felt pad is sandwiched between the wooden surface and the sandpaper.

      I applied a layer of acrylic sealer to the surface of my sandblocks after gluing these vintage pictures onto the top halves of my sample instruments. The acrylic sealer will help to protect the instruments from wear and tear over time. If you would like to make sandblocks like the ones pictured above, you may click on the restored vintage graphics below to download and print the same images that I used for my teacher's samples.

Vintage pictures of a hound playing musical instruments.

The Metropolitan Baptist Church Cherub Choir (ages 3-5) sings 
"What a Mighty God We Serve!"

More Related Content:

The Last of Summer by Nell Brinkley


I have cleaned this lovely cartoon butterfly girl by illustrator, Nell Brinkley. Brinkley has long since flown from the earth but her work is still just as endearing. If you'd like to see more of it, I could include a category here at this blog of her work only. She really was quite a popular artist in the early 20th Century. What do you think?

Nell Brinkley Says:

      Butterflies go with the ending of Summer ---butterfly girls go with the ending of the gay night that is their lives. Butterflies grow rare and at last do not flicker gold anywhere, when the sumac turns scarlet and the aspen on the far hills changes into little golden coins; butterfly girls vanish and are no more dimples and sparkle and laughter when there is no more fun to have, when the lights are out and real work comes. But I love a golden butterfly in the sun; and who doesn't joy to watch the butterfly girl dance her way through the sober faces and the earnest!
      Somebody said, " A butterfly lives but a day-- and what if that day is rainy!" So, little butterfly girl whose day is so short, may it be sunny and clear.

More About Illustrator Nell Brinkley:

Thursday, April 4, 2013

Craft Giant Easter Egg Art!

      Below are student examples of three Giant Easter Egg pictures. Although each example is created with a distinct drawing or painting method, all of the pictures have the same theme. Sometimes crafts on the web are mislabeled under categories that use a method of working to describe the theme. It is the theme that is the subject of an art lesson and it is the method that is the verb describing an art project's process. When art educators are required to write lesson plans, they learn that the title of an art lesson includes the subject and that the description includes the process. 
      But on the web, teachers, crafters and companies selling their ideas and product will list the methods as the subject in order to drive traffic under different words and phrases to their web pages. This is why it is advantageous for teachers to search under both the method or the theme when surfing the web for any sort of craft/art idea.
      This giant Easter Egg was crafted using a popular wax resist method. Young students learn to color with firm pressure onto drawing paper before painting a watery solution of colored paint over the surface of their wax colors. The paint will then leave traces of painted paper where ever the crayons have not been applied. The use of this method is very popular in grade school because it shows students how they can use art materials and also develops their eye-hand coordination.

      This giant Easter Egg sponge painting requires young students to use unconventional tools in the act of painting. Sponges are easy for little hands to manipulate and these hold all kinds of sticky, messy paints made from inexpensive mixtures that kindergarten teachers can quickly shake together without investing large sums of cash in a art project. Small children do not generally produce art that will be kept forever by anyone other than their parents so, it is important to use materials that may be expendable but also fun to work with. The key to developing student performance in art is repetition and inexpensive materials ensure that the activity is repeated frequently.

      This giant, bright colored Easter egg was painted with watercolor paints and a soft camel hair brush. First the student used a black marker to draw her whimsical butterfly, fish and flowers. Then she painted in her picture with bright, festive colors. I have discovered that very young students produce marvelous watercolor paintings but grow apprehensive about the resulting finished product as they age. This is because the younger an art student is, the less inhibited they are about "how" their artwork looks. Their inhibitions are the unfortunate result of growing old, I'm afraid.
More Helpful Links to Homemade Paint Mixtures:

This video, from Nuttin' but preschool, demonstrates an excellent step-by-step process for making homemade "tempera" paints. However, if you are an artist, you know that actual tempera paints used by professionals include an egg binder. So here is an old recipe for high school students.

"The Butterfly's Ball"


The Butterfly's Ball Poem
On the smooth-shaven grass by the side of the wood,
Beneath a broad oak that for ages has stood,
See the children of earth, and the tenants of air,
For an evening's amusement together repair.

And there came the Beetle, so blind, and so black,
Who carried the Emmet, his friend, on his back;
And there came the Gnat, and the Dragonfly too,
And all their relations, green, orange, and blue.

And there came the Moth, with her plumage of down,
And the Hornet, with jacket of yellow and brown,
Who with him, the Wasp, his companion did bring;
They promised the evening to lay by their sting.

Then the sly little Dormouse peep'd out of his hole,
And let to the feast his blind cousin the Mole;
And the Snail, with her horns peeping out from her shell,
Came fatigued with the distance, the length of an ell.

A Mushroom the table, and on it were spread
A Water-dock-leaf, which their table-cloth made,
The viands were various, to each of their taste,
And the Bee brought the honey to sweeten the feast.

With steps more majestic that Snail did advance,
And he promised the gazers a minuet dance;
But they all laughed so loudly he pull'd in his head,
And went, in his own little chamber, to bed.

Then as evening gave way to the shadows of night,
Their watchman, the Glow-worm, came out with his light;
So home let us hasten, while yet we can see,
For no watchman is waiting for you or for me.

Color A Celtic Resurrection Butterfly Cross

       I used metallic ink pens to color in my teacher's sample cross drawing. These inks really stand out if you draw with them on dark or black construction paper. Although, I chose to draw on a nice acid free paper for this particular activity (construction paper fades rapidly). The project is designed for students fourth grade and up. I've included patterns for the butterfly and cross below for those of you who would like to draw a cross very similar to mine. I colored the floral part of my design with Rembrandt colored pencils. These have a nice velvety texture that sharply compliments the metallic inks.
      The butterfly in the modern Christian church, and when I say modern I mean within the last 100 years, is used as a symbol for resurrection. This is because the metamorphosis that takes place during the life cycle of butterflies mirrors the lives of regenerated Christians in both life and death after the Holy Spirit indwells them personally. The cross, in turn, symbolizes the beginning of this resurrection process because of the ultimate price of salvation paid for us through Christ's death on the cross and His resurrection from the tomb.
      Encourage your students to frame their work if they are pleased with the results. I have found that many parents love to receive simple drawings such as these for a birthday or Mother's Day and/or Father's Day gift.
This is my teacher's sample of a Resurrection Butterfly Cross. Students can use all kinds of metallic ink pens to color in their sketches. They will need to use a white or yellow colored pencil to trace around their stencils before applying the inks. Although I chose silver for my sample, this pattern would look just as attractive in gold or copper inks.

Click directly on the image to download the largest possible file. You will need to fold an additional piece of paper and place the dotted lines of the cross template on top of the fold to cut out the entire cross pattern.

More Links to Cross Drawing/Coloring Projects:

Saturday, March 30, 2013

What Easter Should Mean?

      Does Easter mean to you only the wearing of a new hat, a new frock and the studying of fashions as worn by others? Do you let it bring to your little ones only the rabbit's nest of colored eggs or the fluffs of yellow chicks? Does it strike no higher chord in your being than the fact that spring is at hand and you must have light and becoming apparel?
      Easter is more than all these. It is the force in nature that brings the leaf, the bud and at last the glowing blossom from the clod. It is the resurrection of the life of those things we call inanimate because they cannot talk to us; how much more than the springing into being of the good that may be dormant in our hearts?
      What the little ones should be told this Easter morning is that the life of the world itself is new; that the grave cannot hold within its confines the mighty spirit of growing things. So I beg of you to not dwell too largely upon the sadness of the cross and the crown of thorns, but rather upon the glorious truth that those were but small in comparison with the glory of Christ's rising. 
      If the remembrance of the freeing from the tomb means anything in teaching Christianity it means the beauty of the resurrection; It means that the very spirit of "Christ risen from the dead" is to be carried out in real life; that joy and fresh, glowing happiness are to be taught and believed in. Gloom has no place on Easter day. What is past is past; troubles that have come are gone; pain that has been suffered and cured is to be forgotten, and this is the meaning that Easter should bring into every mother's morning greeting to her little ones.
      "You were ill yesterday, but you are well today." You are to live as if the sun was newly born, the skies newly washed in their sunny blue, the stars but just freshly placed to shine to give you pleasure, the moon sailing like a beautiful round globe for your eyes to see. All these mean a keener enjoyment, a better understanding, and you will find response in each small body and loving heart of the practice be the teaching of the Golden Rule, not only today, but all the year. by Emma Irene McLagan, St. Louis Globe-Democrat.

A powerful worship song from the album "Glorious" by CFNI
Watch more Kari Jobe music videos at http://www.godtube.com/artist/kari-jobe

Citizens Of Heaven
       And when now the dignified forms of another world appeared before their raptured vision, when they beheld the pillars of the old covenant in conversation with Jesus-namely, the majestic lawgiver, Moses, and the mighty prophet, Elijah-must they not have felt already as the citizens of another and higher sphere, as members of that blessed assembly of the just who are gathered on the other side, at home with the Lord? In such company it is no wonder that Peter exclaimed in ecstacy: "It is good for us to be here." It seemed to him as if he was greeted with the salutation of the world to come: "Now, therefore, we are no more strangers and foreigners, but fellow citizens with the saints, and of the household of God." Ephesians 2: 18-19 Charles Gerok, D. D. (Germany)

Thursday, March 28, 2013

"Consider the lilies . . .

Click on the image to download the largest file.

Description of Coloring Page: text "Consider the lilies how they grow they toil not, they spin not" from Luke 12:27, large bouquet of tiger lilies

More Lilies and Scripture Combinations to Color:
Don't forget to drag the png. or jpg into a Word Document and enlarge the image as much as possible before printing it folks. If you have a question about this scripture coloring page, just type into the comment box located directly below this post and I'll try to get back to you as soon as I can.

Craft An Empty Tomb Easter Egg

The finished empty tomb Easter egg, front and side.

    I crafted this empty tomb Easter egg with air dry clay, a half shaped, Styrofoam egg and paint.      The egg form also has a hollow interior and I will post a photo of what these look like just as soon as I can take a picture. 
      For those of you who may be a bit intimidated by shaping your own stones from clay, there are shallow molds for sale in craft and hobby shops for the very purpose of crafting stone walls. The results are so nice that the purchase of one of these is an excellent investment. 
      After pressing the air dry clay into a mold, (shown below) simply adhere the printed clay to the Styrofoam egg with tacky white glue. You will then need to continue working while your clay is still wet. Use a toothpick or a fork and work the clay surface a bit by pushing deeper crevices between the stones to create a more three-dimensional stone wall surface.      I let my stone tomb egg dry over night then I painted it's interior with black acrylic paint. Next, I painted the exterior stones with shades of grey and pale browns. Being satisfied with my final results, I then pasted a cross shaped sticker to the interior of the egg shaped tomb and gave my entire Easter egg a coat of acrylic varnish.

Craft stained glass windows from melted crayons

      Remember melting crayons to create beautiful stained glass window art when you were a kid? My Sunday School teacher did this in class with us many years ago. We would shave crayons with small hand-held pencil sharpeners onto white tissue paper. Then our teachers would carefully cover our tissue and shavings with wax paper and carry the layers over to an ironing board and melt them by rubbing a hot iron over the surface of the wax paper. 
      You can actually achieve the same melted effect by using a hair dryer if you wish. I also remove the wax paper after it has cooled. This only takes seconds to accomplish and then all you need to do is cut a black template from construction paper in order to frame your melted master piece.
      This craft needs adult supervision and patience. I've used some stained glass window frames for me teaching samples that are a bit complex. Design stencils for window frames that are simpler if your students are younger.  Have the children cut out the frames before shaving and melting crayons.
Above you can see that a small hand-held pencil sharpener is quite adequate for shaving crayons. Remove the paper first and don't use too many dark colors for your mix, otherwise, the results can turn a bit muddy. I used the original cut templates for my teacher's sample so that I wouldn't need to cut my stencils twice. After this I then created a template from the sample that could be printed out in black and white so that my students only needed to cut out the center of the design.
Just left, you can see the stained glass window taped onto an actual window. The colors a very brilliant. I have limited my color choices to reds, oranges and yellows in order to emphasize a monochromatic palette. You may wish to teach students about color mixing or the color wheel during this lesson by requiring young students shave together particular color combinations.

Wednesday, March 27, 2013

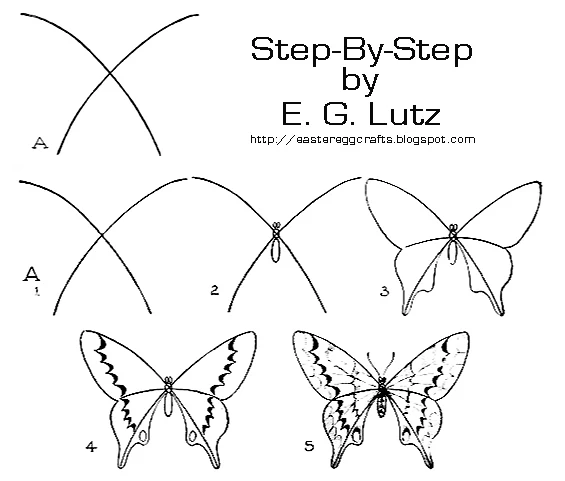
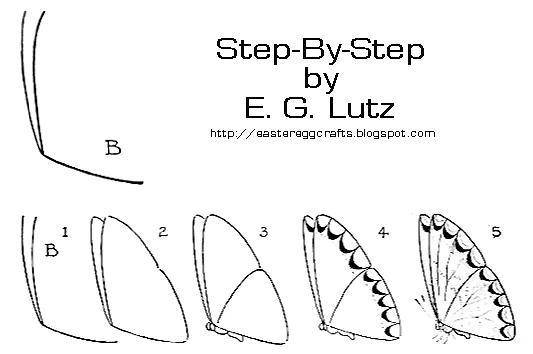
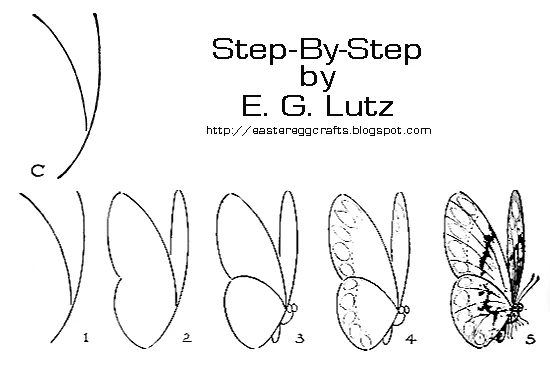
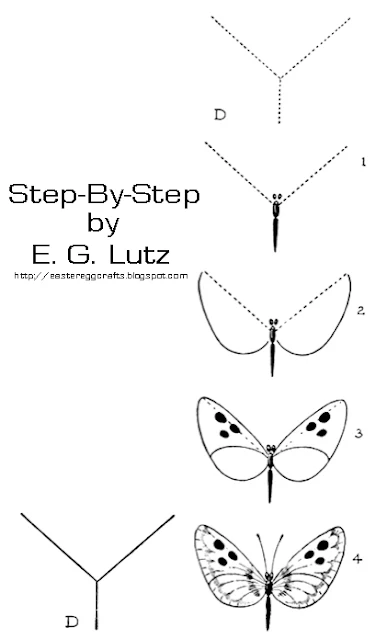
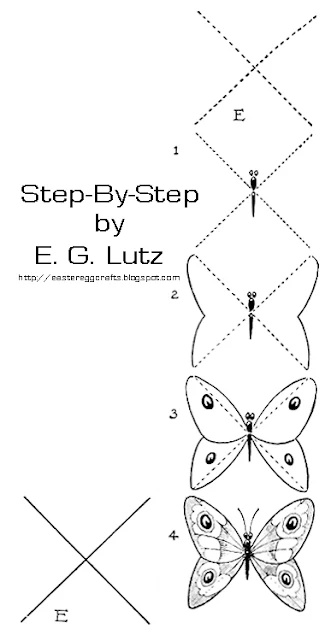
Drawing Butterflies By Progressive Steps

     I have included here a series of five, butterfly, drawing exercises from an old book. In each case it is the last figure of each series of diagrams that you are striving to copy.
      Learning to draw is best when students are encouraged by multiple means of processing information. Teachers should encourage progressive diagram drawing, drawing from real life, drawing from artworks and from their imaginations. The more articulate the student, the easier it becomes for him or her to express themselves. It is difficult for art students to become articulate if their teacher is attaching too much philosophy to practice early in their pupil's development.
      Each method of drawing accesses different areas of the brain. Educators will soon discover that different students excel at different rates according to their familiarity with utilizing that particular part of their brain. Teaching art to the very young should focus primarily on the absorption of knowledge and how to use it within a wide variety of circumstance/context. 
      All artists should be given time to learn how to manipulate information without having the process judged by those art educators that teach according to current popular belief.  Do not fixate on artistic schools of thought or practice until a student is approximately sixteen or older and is able to make important choices for himself apart from your personal tastes and opinions.
      The method of drawing illustrated in the jpgs. below, is very appropriate for cartoonists or graphic designers to learn. Encourage art students to try this method of making art along with many other practices inside your classroom.
full frontal butterfly draw

Draw butterfly from side.

Draw another butterfly from side.
Smaller butterfly drawing challenge.

Last step-by-step butterfly drawing challenge.

Tuesday, March 26, 2013

The Resurrection Illustrated

     So it is that out of these elementary particles human bodies are built, and out of nature's storehouse God will in some way reinvest the spirit with a material organism. We can well believe that this is possible in the light of what chemistry can do.  There are many things which the chemist can do which we would not believe to be possible did we not know them to be facts. I think it is Dr. Brown who quotes from Mr. Hallet the story of a gentleman who was something of a chemist, who had given a faithful servant a silver cup. The servant dropped the cup in a vessel of what he supposed to be pure water, but which in reality was aqua fortis. He let it lie there not thinking it could receive any harm, but, returning some time after, saw the cup gradually dissolving. He was loudly bewailing his loss when he was told his master could restore the cup for him. He could not believe it. "Do you not see," he said, "that it is dissolving before our sight?" But at last the master was brought to the spot. He called for some salt water, which he poured into the vessel, and told the servant to watch. By and by the silver cup began to gather as a white powder at the bottom. When the deposit was complete the master said to the servant, "Pour off the liquid, gather up this dust, have it melted and run together, then take it to the workman and let him hammer the cup again." You may take gold; you may file it down to a powder, mix it with other metals, throw it into the fire, do what you will with it, and the chemist will bring back with certainty the exact gold.
      Thus our bodies are built up by fruits from the tropics, by grain from the prairies. The flesh that roamed the plains as cattle has even become part of us. If God can build up human bodies here, can He not find and convert the dust that we put away in the grave, and bring it back to forms of life? In my judgment, God is able to preserve even the particles of the human body and restore them. So far as the power is concerned, it can be done, and will be done, as God may think best. by H. W. Thomas, D. D.

Be still, and know that I am God: I will be exalted among the 
heathen, I will be exalted in the earth. Psalm 46:10 
The song is, "Before The Day" by Newsong 

If I may stand before His throne,
And look upon His face,
What shall I care that oft, alone,
Like Him, I ran my race.

Safe on thy ever blissful plains,
My heart's own treasure gathered there;
Farewell, forever, sins and pains,
Farewell, bereavement, sorrow and care!
C. Huntington.

Christ Rose By His Own Power

      He rose in the night; no hand at the door, no voice in his ear, no rough touch awakening him. Other watchers than Pilate's soldiers stood by the sepulchre; but these angels whom it will became to keep guard at this dead man's chamber door, beyond opening it, beyond rolling away the stone, beyond looking on with wondering eyes, took no part in the scenes of that eventful morning. The hour sounds; the appointed time arrives. Having slept out his sleep, Jesus stirs; he awakes of his own accord he rises by his own power; and arranging, or leaving attending angels to arrange, the linen clothes, he walks out on the dewy ground, beneath the starry sky, to turn grief into the greatest joy, and hail the breaking of the brightest morn that ever rose on this guilty world. That open empty tomb assures us of a day when ours too shall be as empty. Having raised himself, he has power to raise his people, panic-stricken soldiers flying to the scene, and Mary rising from his blessed feet to hasten to the city, to rush through the streets, to burst in among the disciples, and with a voice of joy to cry, His is risen, He is risen! prove this is no vain brag or boast, "I lay down my life that I might take it again. No man taketh it from me, but I lay it down of myself. I have the power to lay it down, and I have power to take it again." Rev. Dr. Gutherie.


Phil Wickham sings, "Christ Is Risen"
 
MAN REDEEMABLE

With other ministrations thou, O Nature!
Healest thy wandering and distempered child:
Thou pourest on him thy soft influences,
Thy sunny hues, fair forms, and breathing sweets,—

Thy melodies of woods, and winds, and waters
Till he relent, and can no more endure
To be a jarring and a dissonant thing
Amid this general dance and minstrelsy;

But, bursting into tears, wins back his way,
His angry spirit healed and harmonized
By the benignant touch of love and beauty.


Samuel Taylor Coleridge.

The Present, Past And Future

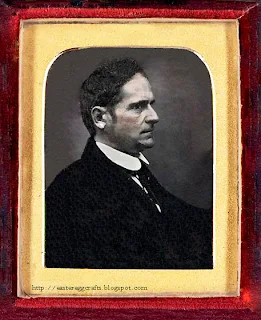
An early daguerreotype of
 Senator and Episcopalian,
Daniel Webster.
      It is noble faculty of our nature which enables us to connect out thoughts, our sympathies, and our happiness, with what is distant in place or time; and, looking before and after, to hold communion at once with our ancestors and our posterity. Human and mortal although we are, we are nevertheless not mere insulated beings, without relation to past or the future. Neither the point of time, nor the spot of earth, in which we physically live, bounds our rational and intellectual enjoyments. We live in the past by a knowledge of its history; and in the future by hope and anticipation.
      As it is not a vain and false, but an exalted and religious imagination, which leads us to raise our thoughts from the orb, which, amid this universe of worlds, the Creator has given us to inhabit, and to send them with something of the feeding which nature prompts, and teaches to be proper among children of the same External Parent, to the contemplation of the myriads of fellow-beings, with which His goodness has peopled the infinite space--so neither is it false or vain to consider ourselves as interested and connected with our whole race, through all time; allied to our ancestors; allied to our posterity; closely compacted on all sides with others; ourselves being but links in the great chain of being, which begins with the origin of our race, runs onward through its successive generations, binding together the past, the present and the future, and terminating at last with the consummation of all things earthly, at the throne of God. - Daniel Webster.
 
LONG LIFE AND HARD STUDY

       Devotion to intellectual pursuits and to studies, even of the most severe and unremitting character, is not incompatible with extreme longevity, terminated by a serene and unclouded sunset. Dr. Johnson composed his “Dictionary” in seven years! And during that time he wrote also the Prologue to the opening of Drury Lane Theatre; the “Vanity of Human Wishes;” the tragedy of “Irene;” and the “Rambler;”—an almost incomprehensible effort of mind. He lived to the age of seventy-five. When Fontenelle’s brilliant career terminated, and he was asked if he felt pain, he replied, “ I only feel a difficulty of existing.”

Monday, March 25, 2013

How To Decoupage a Picture On To An Easter Egg

Here is an obvious question. "How do you decoupage a picture or a scene onto an egg?" Obvious question, rarely answered. Above you see a sweet example of this from a manufacturer of Easter novelty.


Here is my version of the same process, only, I've used an elaborate patterned design.


This lovely pattern was taken from a fancy dinner napkin. You need to separate the layers.
 Only use the top one.


Measure the length of your egg and cut rectangular strip from the napkin or tissue paper to fit neatly around it. Now you will need to cut at regular intervals, slashes into your design. Notice how I do NOT cut all the way through the rectangle. I leave about an inch uncut. This uncut central part of the rectangle is the continuous, uninterrupted part of the design that wraps around the mid section of the egg. The larger your egg the wider this section will be. After cutting this napkin thus, apply Mod Podge to the surface of your egg and carefully paste down the napkin, starting first with the middle part of the design. The fringed parts of the napkin will overlap some but the design will be preserved for the most part.


After cutting and gluing this first piece of the napkin, I then cut out parts of the design that I thought the most attractive from left over napkins and pasted these on the top and bottom parts of my egg where the design did not cover. This is because I used very large eggs for this project and my napkins were quite small.


This is the wider, bottom half of my egg that needed additional
 decoupage to cover it completely.


In order for your eggs to look professional, you need to use very thin
tissues for this project. This insures that the design will appear uninterrupted
 and hand painted. Also, I was very particular about the colors of eggs that
I used for the design. Had I used dark blue or purple plastic eggs,
this design would not be as attractive. The napkin is very thin and the
colors will show through the glue and tissue, so be selective. This egg was
yellow. The one below was pink.


Decoupage Easter Eggs:

Antique Patterns for Easter Eggs

Patterns from left to right in order: An Old-Fashioned Calico Egg,
A Design Taken From Bright Ribbons, Czechoslovakia flowers in bright colors,
A row of yellow ducks on a batik egg and flowers/bow-knots from an old silk.

      I've included in this post, five antique patterns for you to copy and paint on your Easter eggs this year. Have fun!

More Antique Eggs:

From The Cross to The Crown

 
Hark to the Master's voice so sweetly calling,
"Come, follow Me
O'er the dim moorland, where the dews are falling,
O'er hill and lees
Forsake for Me thy dear familiar places,
Thy father's shelter'd house, thy cherished beding placed,
Out in the stormy night,
Far from the warmth and light.
I have a cross for thee.

Arise! for in the East the dawn is breaking,
And come away,
My burden on thy shoulders meekly taking,
Nor even stay
Kiss once more through blinding tears they dearest,
O' clasp with bleeding, breaking heart thy nearest,
Hands must unloose their hold.
Earth's joys grow faint and cold--
I will be all to thee.

Have I not trod life's bitter road before thee
With bleeding feet,
Bearing alone the Cross that shineth oer thee
With message sweet?
For thy sake have I wander'd faint and weary
Thro crowed city ways and deserts dreary,
High on the mountain bare
Thro' the long nights of prayer
Have I not thought of thee?

When night is darkest and the way seems longest
Press onward still,
Striving in thickest fight when foes are strongest
To do My will.
Look not behind thee to thy soul's undoings
Urge on thy footsteps faint, yet still pursuing.
When clouds above thee dose
Whisper to me thy woes--
Am I not near to thee?

"Tis but a little while and then the dawing
When I will come
In the bright sunrise of eternal morning
To call thee home.
If thou hast follow'd me through gloom and sadness
Shall I not comfort thee with joy and gladness?
When life's dark days are o'er
There on the shining shore
I have a Crown for thee."

by George Byng

Saturday, March 23, 2013

Harnessed Easter Chicks

This vintage Easter postcard would look lovely in any craft project!
Description of Illustration: postcard, chicks pull a giant egg on wheels, little girl in pink, pussy willow, landscape

Have a question about the illustration? Just type it in the comment box and I'll get back to you as soon as possible. I only publish content that is closely related to the subject folks.

Easter Chick Serenade

Above, chicks serenade each other in a small boat. Below,
 a male chick is looking forward to serenading his tweetheart.
Description of Illustration: Easter dye cuts and scraps, singing chick with mandolin, egg view, blue trims and ribbons, roses, forget-me-nots, lily of the valley, field, text "Best Easter Wishes


Have a question about the illustration? Just type it in the comment box and I'll get back to you as soon as possible. I only publish content that is closely related to the subject folks.

Color these gentlemen purchasing Easter lilies

These fine gentlemen are at the market purchasing Easter lilies. It looks like one of them is giving a bloom to a special little girl as well. Click on the illustration for the largest size possible.
Description of Coloring Page: This Easter market is by the sea. , baskets, children, nun, plant sell, seagulls, fashionably dressed men
 
 More Lilies to Color:
Don't forget to drag the png. or jpg into a Word Document and enlarge the image as much as possible before printing it folks. If you have a question about this coloring page, just type into the comment box located directly below this post and I'll try to get back to you as soon as I can.

Color Easter Fashion from Berberich's

This fashionable lady is out for a stroll with her greyhounds on Easter morning.
 
Description of Coloring Page:  fashion from 1918, greyhounds, walking the dogs,
 
More Fashionable Ladies to Color:
Don't forget to drag the png. or jpg into a Word Document and enlarge the image as much as possible before printing it folks. If you have a question about this coloring page, just type into the comment box located directly below this post and I'll try to get back to you as soon as I can.

Color Easter Fashions for Ladies from 1913

 
Description of Coloring Page: Easter parade, gowns, fashions, garden, 1913
 
Don't forget to drag the png. or jpg into a Word Document and enlarge the image as much as possible before printing it folks. If you have a question about this Easter coloring page, just type into the comment box located directly below this post and I'll try to get back to you as soon as I can.

Thursday, March 21, 2013

Velveteen Violets on A Vintage Easter Egg


      This little violet dyed, Easter egg is perhaps the oldest egg I hang on my Easter tree. It was made sometime in the 1940s or 30s. My mother-in-law hung it on her childhood Easter tree. I think the lavender food dye has lasted far longer than anyone could ever had anticipated. The violets are made from molded velveteen.

More Related Content:

A Decorative Bird Box

      I love these little bird boxes by Martha Stewart. I plan to stuff mine with a few Easter treats this year, but these little tweets would be just as sweet to decorate for any festive occasion. The bird boxes come three to a package so I will show you three different ways to decorate them. This first example is perhaps the easiest. 
      First, I painted a thin layer of acrylic varnish all over the surface of my bird box and let it dry over night. Then I used a fine line, permanent, black ink marker to draw swirls and curls emphasizing the raised portions of the bird's wings etc... Afterwards, I coated the box again with a second layer of acrylic varnish.


Wednesday, March 20, 2013

Pin The Ears On The Rabbit

Pin the ears on the rabbit.
      Print out the pictures on which is the earless rabbit and his ears are drawn (below). Hang the earless rabbit on the wall, as shown by the sketch, right. Then cut out the ears included in this post and stick a pin through the little holes marked "Pin."
      Now you are ready to play the game. Blindfold a boy or girl and put one of the ears in his or her hand. Turn the blindfolded one around three times, stopping with face turned to the rabbit. Then let the player step forward and try to pin the ear in the right place.
      All sorts of fun comes from the funny mistakes of the players.
      You can get better results by mounting the rabbit panel and the ears on cardboard.