Showing posts with label Drawing. Show all posts

Thursday, November 13, 2025

Sketching With Crayons

       An unfortunate tendency in the use of certain materials that are particularly adaptable to the primary grades, is that of students and even teachers thinking that higher grades or mature work requires advanced materials. If wax crayons are used by the first grades or if a box of watercolors with only four colors are used in the primary grades, the pupil thinks it a mark of progress if the upper grades allow chalk crayons and watercolors of greater variety; and therefore will not use materials related to beginners. 

With wax crayons it is possible to sketch with simple equipment,
producing a sketch that will not rub off. Sample Alpine Church by
Pedro Lemos.

       This attitude should be discouraged, for after all materials have little to do with real production if the student studies correctly. One great artist said that he would use mud if it gave him the right color in painting. This may be also remembered by those educators who insist that pupils should not mix mediums. Just why some teachers should hold up their hands in horror over a problem that suggests the use of crayon and cut paper or crayon and watercolor has never been satisfactorily explained. We do know that artists from the time of the great masters to this date have used crayon and watercolor, oil-paint and gesso, pencil and watercolor, pen and ink and wash, etc. So why teach today in our schools that which the student tomorrow finds to be untrue in professional practice. 
       I believe that a great many delightful possibilities remain to be discovered and developed in the use of the wax crayon and those crayons that are partly wax; and that these possibilities can be found by any teacher or artist that will use them in their work. To prove this to myself satisfactorily I gave a box of eight wax crayons to a well known landscape artist and asked him to see what he could do with them. Not only were his results very good but he became so interested in the results that he has used them ever since. This same artist, by the way, produces all of his fine watercolor paintings with only six colors in his box. Two yellows, two reds and two blues. His yellows are Gamboge and Chrome Yellow, his blues are Prussian Blue and Cobalt, his reds are Crimson Lake and Indian Red. 
       If we can secure greater possibilities with fewer materials our whole art education will be more productive as we reach points where more materials are available. It may be a strange statement, but nevertheless the work we receive at the office from the lower grades is of a much better standard than that received from the advanced grades, and I believe that it is the result of working with fewer materials and within limitations. Too many things to work with, too many values, too many lines, result in too much detail and over-done results. 
       With the use of wax crayons we have a material that is inexpensive, is easily carried for sketching, does not rub and therefore is fairly permanent, and with varying papers and renderings allows for many variations.
       Every material has a corresponding working surface to which it should be applied to secure best results. A rough or irregular surfaced paper is best for wax crayons. A smooth paper is not good for wax crayon as the crayon refuses to mark well and will not receive additional marks. The ordinary rough manila paper or rough white drawing paper is good. Light stroking of the crayon on the paper will result in the color being received on the surfaces of the rough projections of the paper surface. A second color pressed more firmly will color the lower portions of the paper and a vibrating quality of color is secured which can produce very pleasing effects. 
       In some instances the scraping of parts of the subject or the indicating of detail by scraping with a knife point produces good results. 
       This effect may be seen on the windmill of the color plate. An under color may be revealed by this method which will give an effect even more interesting than where there is no under color. In the use of very rough paper a sky quality of surface texture can be enhanced by spotting the open portions of the paper surface or remaining uncovered spots with a complementary or analogous color to the color first used. 
       The accompanying illustrations show the same subject sketched with different strokes and the results are well worth studying. A pad of rough sketching paper and a little or large box of wax crayons tucked into the vacation baggage this summer may yield a new avenue or opportunity for sketching. Why wait until a large, cumbersome box of paints and sketching paraphernalia be acquired? 
       The thrill of sketching is possible and good results, too, with the oft derided primary wax crayons. And the demand for these crayons has resulted in manufacturers producing them in varying palettes so that a considerable range of hues may be secured. But after all simplicity is the keynote to success with crayons, simple subjects, simple masses, simple colors and restful and satisfactory In the use of very rough paper a sky results will come. 

 The works of God are fair for naught
 Unless our eyes in seeing,
 See hidden in the thing the thought 
Which animates its being. 

Whoever yearns to see aright 
Because his heart is tender, 
Shall catch a glimpse of heavenly light
 In every earthly splendor. 
-Wilhelmina Seegmiller 

Wednesday, November 12, 2025

"Handy" Little Butterflies

A finished handy butterfly stapled to the 
bulletin board in my classroom.
       These little butterflies made with magic markers and construction paper sure come in handy when you need a quick way to decorate your classroom for spring! Little ones can also learn the parts of a butterfly while crafting their butterflies. 
       Students can learn about patterns and colors with this assignment. First they will need to fold a white sheet of paper in half twice and fill in each of the four spaces with patterns of shapes and colors of particular selection. After they have completed this step, students will then need to trace around their hands four times within each square of their designed paper. Cut these hands out to form the wings of your butterflies. I stapled their wings to some simple shapes of a butterfly's thorax cut from black construction paper. You can also add a few chenille stems for antennae. 
       My kindergarteners were so proud of their creations. What seems to be old-fashioned to us is  always entertaining to five year olds. It is one of the many blessings of being new to the world. Every little innocent thing holds some fascination for the very young. 
       Many of these butterflies did not make it to the bulletin board. My kindergarteners loved this butterfly craft so much, they tried to sneak their paper butterflies home! I saw them, however, stuffing their new friends into their backpacks before I could collect all of my bulletin board trim! I stapled the butterflies all over my display areas after students finished this art project. What an easy fun way to fill up bulletin boards!

Supply List:

  • white drawing paper
  • magic markers
  • black construction paper
  • white school glue or stapler
  • one black chenille stem per butterfly

Left, color patterns on drawing paper. Center, trace around child hands for the wings. Right,
glue or staple on black butterfly body and black chenille stems for antenna.

Step-by-Step Instructions:

  1. Fold a sheet of white drawing paper in half and then in half again. Unfold it; now your student will have four spaces to draw four different patterns with a set of magic markers.
  2. Once students have completed their patterns, have them trace around their hands four times and cut out the four hand tracings to attach to their butterfly bodies.
  3. Fold a small, narrow length of black construction paper in half and cut out a simple butterfly shaped body for it.
  4. Glue or staple the handy wings to it. 
  5. Cut one black chenille stem in half.
  6. Twist one end on each half into a little ''c'' shaped loop.
  7. Glue the opposite ends to the top of the handy butterfly to make antenna.

Sunday, April 7, 2013

Frogs, Toads And Pollywogs for Spring

printable paper toy frog

    Cut out the two sides of the frog and paste them together, with a cardboard in between. After pasting the two sides back to back, with the cardboard in between, cut the inside contours, such as between the legs and the arms. Then punch out the holes for the string and fasten the string to a small stick to complete the trapeze. Hold the frog by this stick as you make him go through his performance. Besides the two ways of hanging from the trapeze shown in the sketches, he can also bend his body and hook on (at the places marked X) by one leg. Or he may slide up and down, with the string passing through those places marked with X's.


Need to draw lots of pond life? Here are some step-by-step drawing guides for those of you who
need to learn about dragon-flys, water-lilies, frogs, and tadpoles.


Teachers may download the image above and print one for each student. Ask the students
 to give the King of all pollywogs a crown, scepter, perhaps even a robe. Then challenge them
 to doodle thousands of tadpoles, frogs and toads surrounding their King.

Wednesday, March 27, 2013

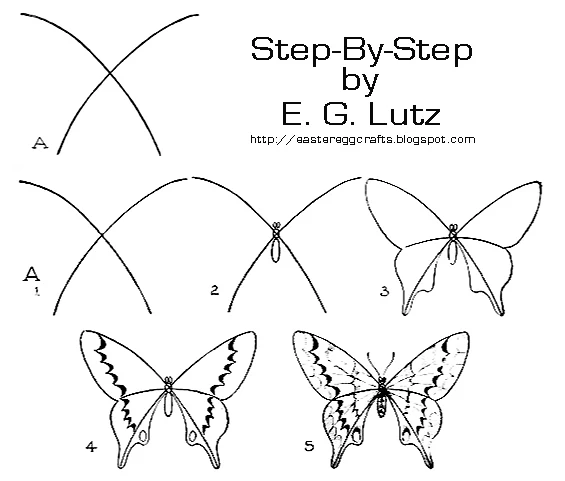
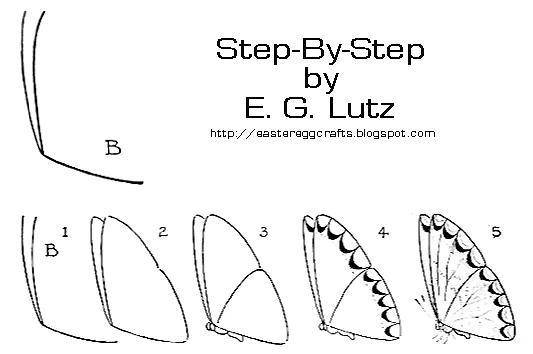
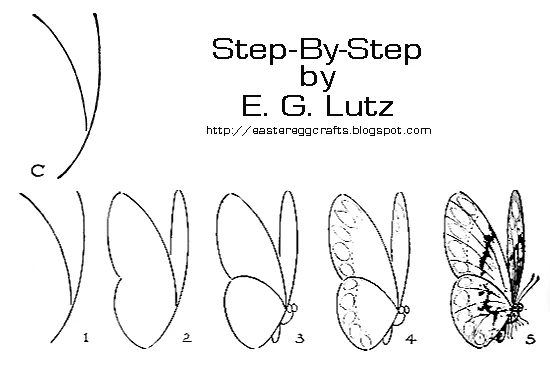
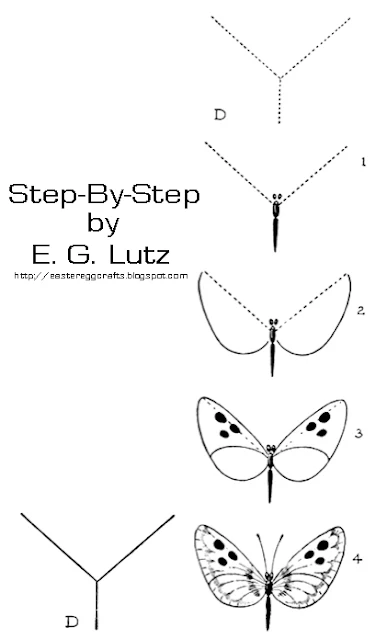
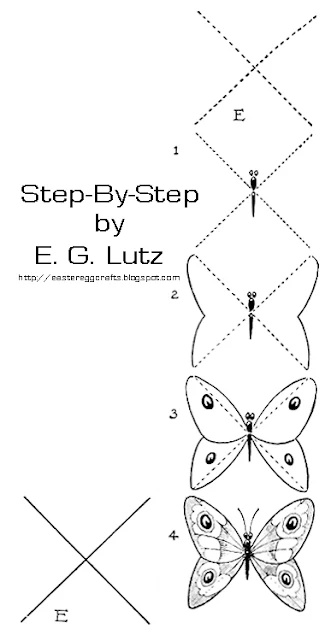
Drawing Butterflies By Progressive Steps

     I have included here a series of five, butterfly, drawing exercises from an old book. In each case it is the last figure of each series of diagrams that you are striving to copy.
      Learning to draw is best when students are encouraged by multiple means of processing information. Teachers should encourage progressive diagram drawing, drawing from real life, drawing from artworks and from their imaginations. The more articulate the student, the easier it becomes for him or her to express themselves. It is difficult for art students to become articulate if their teacher is attaching too much philosophy to practice early in their pupil's development.
      Each method of drawing accesses different areas of the brain. Educators will soon discover that different students excel at different rates according to their familiarity with utilizing that particular part of their brain. Teaching art to the very young should focus primarily on the absorption of knowledge and how to use it within a wide variety of circumstance/context. 
      All artists should be given time to learn how to manipulate information without having the process judged by those art educators that teach according to current popular belief.  Do not fixate on artistic schools of thought or practice until a student is approximately sixteen or older and is able to make important choices for himself apart from your personal tastes and opinions.
      The method of drawing illustrated in the jpgs. below, is very appropriate for cartoonists or graphic designers to learn. Encourage art students to try this method of making art along with many other practices inside your classroom.
full frontal butterfly draw

Draw butterfly from side.

Draw another butterfly from side.
Smaller butterfly drawing challenge.

Last step-by-step butterfly drawing challenge.

Tuesday, March 12, 2013

Stencil Easter Rabbits Eating Clover


      The Easter bunny picture above was made by the use of a series of stencils. The rabbits and the dandelions (taraxacum) where drawn by one method and the clover by another. I also combined colored pencils and crayons in this picture.

Step-by-Step Instructions:
  1. In order to make the soft appearance of the fuzzy animals and the dandelions, I gently rubbed the side of my colors over the top of each stencil with a grey crayon first. The effect resulted in a feathery appearance. 
  2. Next, I traced around the clover and colored in the shapes left behind in a brilliant green crayon, resulting in harder brighter lines and shapes. 
  3. Then I copied the same process from step 1. to draw the dandelion puffs.
  4. Draw the center details of the puffs with colored pencils red and black.
  5. Use Crayons or pencils to color in the sky blue, clover leaves green and the clover buds lavender.
      Teachers in this lesson may then discuss with young students the differences between design elements that are sometimes difficult to communicate in a drawing only. The rabbits look soft; the clover looks smooth. The fur and seeds look fuzzy, the clover looks bright and so on . . . Tactile ideas are easier to communicate through a fabric assignment but sometimes this is not affordable. Visual textures may be easier to believe when associated with objects that are obviously associated with textures small students enjoy in both their toys and in small animals that they are fond of.
      Teachers will need to make stencils in advance for the assignment. These should look similar to the black silhouettes that I have pictured below.

Stencil shapes for drawing above. Enlarge these as needed.

Monday, February 25, 2013

Draw a mother hen and her chicks

      Draw a mother hen and all of her baby chicks. Try to fit as many of them as you can in your farmyard picture. I've included a process drawing below for teachers to project on a white board.

How to draw a mother hen and her chicks by Lutz.

Pick-a-little, Talk-a-little, Cheep, Cheep, Cheep! from a stage performance of "My Fair Lady"

Saturday, February 23, 2013

Draw a Bunny Portrait

      Draw a portrait of a bunny. Here is a step-by-step picture depicting how. I've also included a video of bunnies in cups for those of you who would prefer to work from life.


How to draw a rabbit tutorial.

Sunday, February 17, 2013

A Repeating Line Butterfly Design

      Give students newsprint to fold, design and cut out their own butterfly stencil. 
      Then have them trace around their stencils onto some interesting tissues or napkins printed with bright colors. Cut and decoupage these butterflies to a very large piece of white drawing paper and let the pictures dry. 
     Students may then use markers to draw lines around their butterflies that echo the shapes, colors and rhythms of their butterfly decoupage.

The butterflies appear to vibrate with the rhythm of the line work.

Doodle an Easter bunny or a chick

      Draw a doodle with a thick black marker on your page. Now turn the paper round and inspect the shapes and twists of the lines carefully. How can you turn it into a bunny or chick?
      Add color with markers, crayons or paints to interpret your Easter squiggle into a funny, fuzzy character.

A pink bunny is hiding in my scribble!


Supply List: 
  • colorful markers or colored pencils
  • one black marker
  • one sheet of drawing paper
Step-by-Step Instructions:
  1.  Draw a doodle with a thick black marker on your white construction paper.
  2.  Now turn the paper round and inspect the shapes and twists of the lines carefully. How can you turn it into a bunny or chick?
  3. Color in the bunny shapes using your favorite color.
  4. Don't forget to give the bunny a large, white fluffy tail!
  5. Now color in the rest of the shapes not belonging to the bunny. Make some of them flowers and others grass and still even more of the shapes plants.