Showing posts with label Baskets. Show all posts

Monday, February 7, 2022

Weave a Chenille Stem Easter Basket

The finished yarn and chenille stem basket.

       Learn to make a very sophisticated Easter basket using textured and unusual yarns. This is a perfect Easter craft for using left over yarns that you may have tucked away in the drawer full of discards. I have so many supplies like this! I just hate to be wasteful and not use them somehow... The supplies you will need include: chenille stems (all white), yarn, cardboard, small nail and wire clippers. I made this basket for 2019, but I'm just now getting around to posting it here, sorry.
Selecting the yarn for this craft will greatly
determine how your finished piece looks!
Step-by-Step Instructions:
  1. Cut an oval from heavy cardboard for the bottom of your chenille stem basket.
  2. Use a nail to punch holes along the outer edges of the cardboard bottom.
  3. Bend the ends of each chenille stem around and up through the holes. The length of these fuzzy wires will predetermine the height of the sides of your basket.
  4. At this point you may wish to wire the bottom of your basket with an extra wire or chenille stem if you intend to display it on an Easter egg tree. To wire the bottom push a stem up through and back down into two holes strategically located in the bottom cardboard.
  5. Now continue to weave yarn in and out of every other chenille stem. The yarn you choose to use for this weave will greatly shape and affect the appearance of the basket; so choose carefully.
  6. Shape a wire oval the same size of the base to twist the tips of the chenille stems around at the top of your basket. 
  7. Weave additional yarn around the top edge to cover the top edge till smooth. 
  8. Wire loops at both ends of the basket using covered wires.
  9. Bend another wire for the handle and twist this through the wire loops at both ends to shape the basket handle. 
  10. Cover the basket handle with more yarn.
Left, Cut an oval from heavy cardboard for the bottom of your chenille stem basket.
Center, Use a nail to punch holes along the outer edges of the cardboard bottom.
Right, Bend the ends of each chenille stem around and up through the holes. The
length of these fuzzy wires will predetermine the height of the sides of your basket.

Left, The wires inserted into each nail hole. Right, see what the bottom looks like.

Left, I decided to glue a second layer of cardboard on the bottom of my basket to make it stronger.
Center, At this point you may wish to wire the bottom of your basket with an extra wire or chenille
stem if you intend to display it on an Easter egg tree. To wire the bottom push a stem up through
and back down into two holes strategically located in the bottom cardboard. Right, 
Now continue
 to weave yarn in and out of every other chenille stem. The yarn you choose to use for this
weave will greatly shape and affect the appearance of the basket; so choose carefully.

Left, I chose to switch out my yarn types to make a stripe. Center, the bent oval stem for the top
edge of my basket is the same size as the cardboard bottom, however, you could adjust this to be
larger or smaller to change the shape of your basket. Right, I covered this with yarn before and 
after attaching it.

Left, See the chenille stems wrapped around the wire edge. Right, see that I wrapped the edge of
the basket again with yarn to cover the exposed stems.

More Weaving Crafts:

Wednesday, February 26, 2014

Weave a Pine Needle Basket for A Unique Easter Keepsake

      Below, I've included an article from 1898 describing two sisters that made their living from the meticulous crafting of pine needle baskets. These baskets were first crafted by indigenous peoples long ago but American women soon learned the art of weaving these little beauties during the late 1800s. Pine needle baskets are still highly sought after by collectors today; perhaps you may find  inspiration here to continue the art of weaving a few treasures for your friends and family this Easter? 

Basket Making for Profit, Two New York Girls Have Discovered a New Road to Fortune Which Other Women May Follow, St. Louis Globe-Democrat, 1898
      If you have ever bought a basket of candy in Mexico your attention has no doubt been attracted to the dainty basket as much as to the sweets. The Indians and Mexicans and the "cracker" women of the mountains of the South are expert basket makers, but it is only quite recently that a young woman of New York, trying to solve the difficult poroblem of how a woman may support herself, was attracted to this employment.
a pine needle basket
      While visiting at Aiken, S. C., Miss Mabel Compbell and her sister Stella observed the pretty baskets made of pine needles that were sold at the hotel by the country women. Miss Stella made a little basket after spending a day with the women who taught her, and before she left Aiken became quite expert. The following year Miss Mabel went out West, 'way out in the Indian country, as teacher in a family. The Indians in the neighborhood made many beautiful baskets. At Christmas she sent her sister Stella the prettiest basket to be found. Miss Stella was a typewriter, but disliked the work very much. She suggested to her sister that she learn all she possibly could concerning the making of the baskets, which she did, and also about the curing of the grasses, and in fact, invented many patterns of her own. She forwarded her sister a dozen of the baskets which she had made herself, and a lot of colored grass, in order that she might try her own hand at the art of weaving. Miss Stella combined the Indian and Southern material into a basket of an original design, which she sold to a florist for a good price. Afterward Miss Campbell went to Asheville, N. C., and pursued her quest for information concerning basket making. She returned to New York to find her sister had lost her position, her employer having gone to the war. Florists were consulted, and their orders were so large that it was decided to give all their time to the work.
      A month ago they were obligated to engage a young woman to assist them, and they regard the business as in quite a flourishing condition. They have many more orders on hand than they can fill at present. The baskets are in great demand in other cities than New York--in fact, the largest order they have had to fill came from Washington-and the baskets will be used wherever flowers or fancy candies are sold. They anticipate orders from Chicago and Boston. When the winter season begins it is probable that they will take several girls into their employ, and will be obliged to go into larger quarters. Their summer home is a cottage in the Adirondacks, and they work in an ideal way, out on the veranda, or even taking the work into the woods, sometimes staying for several days at a time.
      A party of young ladies visited them the other day, and, while it was impossible to fill the order they wished to leave, a bright suggestion of one of the girls was well received. She said she would like to take a course of lessons in the art of basket-weaving to add to her other accomplishments, embroidery and painting. Miss Campbell thinks it will be profitable to have classes in New York this winter.
      Miss Campbell, when asked if the work is hare, shrugging her shoulders, said that she had never seen anything worth while that was not hard. There is some drawback to everything, but this work is not so confining as other work taken up by women. It can be accomplished at home for one thing, it is clean, and it does not strain the back or muscles. It must be learned like everything else, the principal requirement being the ability to invent new shapes. Miss Campbell and her sister have found it pleasanter and much more remunerative than either teaching or typewriting, those occupations most affected by the women who are not so fortunately situated as to have homes of their own and a competency.

Resources:
"Watch as Susan Topham takes you through each 
step of a creative and relaxing DIY project."

Monday, February 17, 2014

Craft Basket Weave Rubbings for Easter Egg Pictures

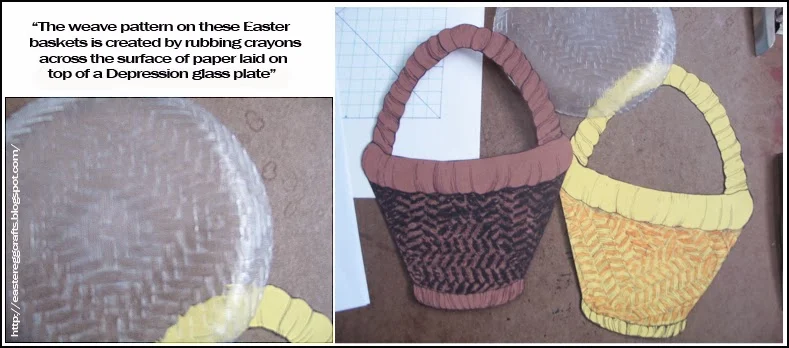
      I made these Easter baskets from crayon rubbings and a simple basket stencil that I cut from cardboard.  Then I pasted a half dozen Easter eggs into my baskets after cutting egg shapes from decorative papers. This simple Easter egg, basket craft can be accomplished by students as young as six or seven, but I would recommend it for students in second through fourth grade.

Supply List:
  • crayons
  • construction paper
  • decorative papers
  • markers and pencils
  • white glue
  • Woven patterned surfaces on placemats, baskets and glass or plastic plates if you can find them
  • scissors
Directions:
  1. Cut and trace a basket stencil. Make this shape simple and with plenty of volume sot that a rubbed texture will be obvious once the project is complete. 
  2. Trace and cut the basket shape from yellow or brown construction paper. 
  3. Then place the cut basket shape on top of a woven textured surface and then rub the side of a darker crayon firmly across the surface. 
  4. Draw additional details onto your paper basket's handle and paste it onto an additional sheet of paper for the background.
  5. Then cut and trace egg pattern onto decorative papers for your Easter eggs. You could also use wrapping paper, wallpaper, etc... for these paper eggs. Use your imagination!
  6. Paste these paper Easter eggs into your basket picture.
"The weave pattern on these Easter basket is created by rubbing crayons across the surface of paper laid on the top of a Depression glass plate." Depressionware is a marvelous surface for children to make rubbings with. Don't use anything too valuable however, they may break the surface accidentally.

More Art Projects Made From Textured Rubbings:

Monday, December 23, 2013

Easter Chick and Tulips Gift Tag

Include this Easter gift tag in your
next basket of goodies.
Description of Illustration: trim an Easter basket or gift with this free decorative tag, chick, tulips, bulb plants, basket weave

Have a question about the illustration? Just type it in the comment box and I'll get back to you as soon as possible. I only publish content that is closely related to the subject folks.

Tuesday, November 19, 2013

A little Easter still life graphic

Craft a lovely little card or invitation with this simple Easter still life.
Description of Illustration: green vase, daisies, woven basket, dyed eggs: yellow, purple and pink

Have a question about the illustration? Just type it in the comment box and I'll get back to you as soon as possible. I only publish content that is closely related to the subject folks.

Tuesday, March 5, 2013

When Planning the Easter Basket

Left, the bow at it's best. Center, a prize winner. Right, tiny rose buds on a round form.
      Which shall it be the gaudy tinsel-decked form filled with candy or rather questionable value, or the Easter basket that combines present beauty with future worth? When planning the basket for the gift, it is undeniable that there should be something more than a combination of much money and little taste; indeed, it is better to have a little less of the former, and by emphasizing the latter, make the Easter basket a gift worthy of the thought.
      A stroll through any basketry department will unfold hundreds of shapes to your eyes--forms so lovely in color and variety that the specially "seasonable" baskets of greens and pinks will be rejected to the past, when beauty was not so much insisted upon.
      From the dull shades that have the advantage of affording a harmonious background for any color, a receptacle for the gift (it may be a plant, flowers, or candy) can be evolved that will stand for the best in this line.
      With green leaves from the flower counter, and pale yellow satin ribbon, a spray of tiny rosebuds it is possible for any woman who has the knack of tying to decorate a superior basket. The basket form (left) pictured above is decorated with three or four loops of ribbon for the making of each bud. Notice the attractive line that trails around the shapes in graceful abandon.
      On the bucket-shaped wicker basket, center, a larger rose and bud are used. The petals are made separately of two pieces of silk, and stamens make up the attractive center. Large leaves are placed between the silken forms. The result is particularly pleasing.
      The high standing basket (right) above shows the effective use of a bow--not the stiff large form that spells yards of expensive ribbon, but the soft French bow, secured by twisting the ribbon before tying. From this, a few satin roses and green leaves follow the weave up to the top.
      For those who prefer the undecorated form, a round basket filled with fresh eggs contains no headaches for the fortunate recipient. It is a gift for an invalid that will bring the thought of the giver in tangible form. If for the little boy or girl, a morning spent in decorating the eggs with  faces, or colors, will fully compensate for the lack of the sweets that usually result in vain regrets. 
      It is hardly necessary to suggest that each of these baskets will fit into a niche when the Easter season is no more. For the porch, the sewing table or the library shelf they will supply just the tangible reminder that we are improving in the appreciation of the beautiful. A basket selected and decorated in this fashion will be received with as much joy as the coming of the springtime.

Weave a Miniature Yarn Easter Basket

      This miniature basket is woven using a braided rag rug method. To make a basket the size of the one pictured here you would need:
  • A braided length of yarn measuring approximately one yard; use three colors of any yarn or embroidery floss that you may have on hand.
  • You will also need thread and a needle. 
  • masking tape
  • You will also need some kind of a spool like form; I used a toothbrush container.

      Above is a pictured sequence for making the basket. If you click on the photo it will look larger in a new window. As you can see in the second frame, you will need to work the braid in a spiral pattern until it is roughly the size of a small coin. Whip stitch the shape as you go with the needle and thread. The color of your thread will be exposed so choose that shade wisely. I chose a shade of pale grey because I liked the way that it looked. Some of you, however, may choose to conceal your stitches by matching them to the yarn colors. 
      Loop the two ends of a piece of masking tape together and press it firmly to the end of your basket's temporary form and then mount the coin sized bottom of your miniature basket onto the the form. Now, as you spin and sew together the sides of the braided yarn to itself, the shape of the basket walls will begin to form. Soon, you will have a tiny basket fit for an egg. After you have crafted the basket to the size that you desire remove it from the temporary form. Add a handle by looping the remainder of the braided yarn from one side of the basket to the other, sewing these in place. You can always add more braid into the basket design with a threaded needle should the basket appear longer on one side.

Wednesday, February 20, 2013

Weave an Easter Basket Scene

      This is a time consuming project that has wonderful results when completed. I recommend this craft for students in 3rd or 4th grade. It will take time for them to create their pictures and to also carefully follow instructions. Never avoid teaching art assignments to older children for any of these reasons. Perseverance is a rewording human attribute to develop and nurture in the young. They will make something they can be proud of and teachers will learn to adapt processes to challenge their aging protégé.
Far left: I cut a basket stencil to fit the largest piece of standard sized construction paper I could find. Working large for this art project makes it much easier for a small child to craft. Adults may scale the activity down and create interesting Easter cards using the same weaving process with ribbons if they'd like. Center: Here you can see; I've traced around my stencil and added long wavy lines down the front vessel part of my basket design. I then cut along these lines that imitate the 'warp' part of the woven design. Proceed then to use long strips of construction paper to mimic the 'weft' process by which the construction paper basket is woven. Far Right: After I have woven my basket, I will paste down and tuck in loose edges of the design on the front side of the basket to hide any imperfections.
Far Left: Turn the woven design over and mask the back side of your picture before cutting it out. Center: Cut out the basket carefully; remember to leave approximately 1/8 of an inch around the edges of your flat woven basket as you go. Far Right: The finished basket is now glued along the edges only and adhered to a bright white background. Only the edges of the basket and the handle of the basket are glued, so that additional paper elements may be added into the inside of the flat woven picture in the end.
Cut some grass to add to the bottom of your woven Easter picture. Measure from the bottom of your background paper up to the point where you would like the grass to cover the bottom of the basket. Double this measurement and cut a strip of green construction paper out that will run the length of the white construction paper. Fold the paper in have horizontally and cut narrow slashed along the folded edge only. Be careful not to cut all the way to the other edge of your folded paper; leave about 1/8 of an inch of an additional boarder. Unfold your grass border. It should look something like the one pictured above. The cuts do not need to be as regular as mine.
 Now refold your green construction paper and staple it to the white construction paper along the bottom edge.
Left: Cut the loops in half. Right: Give your grass a bit of a fringe with the sharp edge of your scissors.
Now you can cut and color some bright eggs, peeps, and a chocolate bunny to add to your woven Easter picture. I also stuffed the basket with green, paper, Easter grass in order to enhance the three dimensional effect. Glue the paper embellishments on the complete picture.

Tuesday, February 19, 2013

Paper Doily Baskets for Easter

      These little paper doily baskets are so adorable! They are very light weight so you can hang them on an Easter tree. They would also make cute party favors as well. I dressed mine up with stickers and ribbon. I also hand-colored the paper doilies before gluing them onto white typing paper; the possibilities here are endless. This is an easy basket craft for small children to craft as well.


Paper doily basket instructions.
      I purchased my doilies at a craft store but you could cut your own doilies. This would be a nice additional step for older children to do before constructing the basket. Remember crafts for older students need to be made a little more challenging in order to maintain their interest and teach them new methods.
 Video that shows how to cut paper doilies.

Baby's Easter Basket from 1894

I found this tiny article for the making of an Easter basket for an infant in a newspaper from 1894. The idea is sweet, however, some of you may wish to update it a bit. Apparently, you can still purchase violet powder from The Williamsburg Marketplace.

A Charming Little Gift Which Unites Utility and Beauty.

      This is a delightful gift to the little one, combining as it does utility and beauty. Take a small basket and gild it. Make small rosettes of pink or blue baby ribbon and sew them around the edge and over the handle as shows. 
      Fill the basket with white swan's-down cotton and place the prepared eggs, one on either side.
      To prepare the eggs make small holes in the ends and expel the contents by blowing. When empty and dry fill with violet powder. Cover the ends with perforated white court-plaster. pasted on neatly, making the perforations with a shoe-punch.
      A powder puff tied to the handle adds to the effectiveness. The powder can be dusted on the tender flesh from the egg and "smoothed down" by means of the puff.

Additional Gift Basket Ideas for The Modern Baby - by Natalie:

A-Tisket, A Tasket, A Green and Yellow Basket

      This green and yellow Easter basket was made with inexpensive white paper plates, tissue paper, ruffled cup cake liners and a bit of lacy, green ribbon. I've included below the sequence for folding and stapling the basket together. Prior to this step, I glued fancy tissue paper onto my paper plates. You can use white school glue or Mod Podge for this step. I also hot glued yellow, ruffled, paper liners to the edges of the paper plates before stapling these together. The handle was stapled on at the very end of the process. This is very simple and inexpensive way to craft large quantities of Easter baskets. The project would also be an excellent one for those of you who celebrate May Day.

      Click on the photo to see it larger. The basket may be stapled together with only three staples. These paper plate baskets can be mass produced by art teachers, classroom teachers or Sunday school teachers for little ones to decorate however they wish. These are very affordable alternatives to what you might end up purchasing elsewhere. These paper basket versions are also quite durable!

Spring by Jane Smith, (11 years old)
Spring is the merriest time of year,
When children usually are full of cheer,
And flowers bloom and birds all sing-
That is the way it is in the spring.

Saturday, February 2, 2013

Bunny Delivers Easter Basket


Description of Illustration: a bunny carries an Easter basket between his teeth, violets, graphic comes in multiple colors: blue, apricot, grey, green, pink, purple, brown and yellow


Have a question about the illustration? Just type it in the comment box and I'll get back to you as soon as possible. I only publish content that is closely related to the subject folks.

Easter Eggs and Pussy Willow

Description of Illustration:  eggs dyed pink, gold, grey, lavender and blue, baby chicks, pussy willow and lily of the valley, basket with lid

Have a question about the illustration? Just type it in the comment box and I'll get back to you as soon as possible. I only publish content that is closely related to the subject folks.

Friday, February 1, 2013

Pussy Willow In an Easter Basket

Description of Illustration: pussy willow and lily of the valley arranged inside a basket, Easter egg painted, lavender ribbon

Have a question about the illustration? Just type it in the comment box and I'll get back to you as soon as possible. I only publish content that is closely related to the subject folks.

Saturday, January 5, 2013

Easter Chick & Forget-Me-Nots

This little Easter basket contains a vintage chick and forget-me-nots.
Description of Illustration: basket for Spring, forget-me-nots, text "With Best Wishes" yellow chick, wicker woven, gift tag

Have a question about the illustration? Just type it in the comment box and I'll get back to you as soon as possible. I only publish content that is closely related to the subject folks.

Friday, January 4, 2013

Easter Blessings


Description of Illustration: Easter rabbits prepare to deliver dyed eggs, basket, Easter grass, dye cut, vintage clip art, bunnies, text "Easter Blessings"

Have a question about the illustration? Just type it in the comment box and I'll get back to you as soon as possible. I only publish content that is closely related to the subject folks.